


74.
Remove rip fence from table during any operations which utilize the
m
iter gauge.
M
ake sure blade guard is installed for all “thru-sawing” operations
(when sawblade cuts entirely thru the thickness of the workpiece).
Replace guard IMMEDIATELY after completion of dadoing,
m
olding or rabbeting cuts.
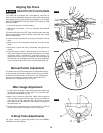
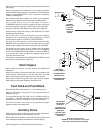
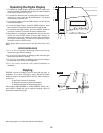
Have blade extend approximately 1/8" above top of workpiece.
Additional blade exposure would increase the hazard potential.
Do not stand directly in front of the blade in case of a
THROWBACK (small cut-off piece caught by the back of the blade
and thrown toward the operator). Stand to either side of the blade.
Keep your hands clear of the blade and out of the path of the blade.
If blade stalls or stops while cutting, TURN SWITCH OFF before
attempting to free the blade.
Do not reach over or behind the blade to pull the workpiece
through the cut, to support long or heavy workpieces, to remove
cut-off pieces of material or FOR ANY OTHER REASON.
Do not pick up small pieces of cut-off material from the table.
REMOVE them by pushing them OFF the table with a long stick.
Otherwise they could be thrown back at you by the rear of the blade.
Do not remove small pieces of cut-off material that may become
TRAPPED inside the blade guard while the saw is RUNNING.
THIS COULD ENDANGER YOUR HANDS or cause a KICKBACK.
Turn the saw OFF. After the blade has stopped turning, lift the
guard and remove the piece.
If workpiece is warped, place the CONCAVE side DOWN. This will
prevent it from rocking while it is being cut.
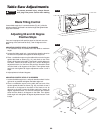
Work Helpers
Before cutting any wood on your saw, study all of the “Basic Saw
Operations”.
Notice that in order to make some of the cuts, it is necessary to use
certain devices, “Work Helpers”, like the Push Stick, the Push
Block and the Auxiliary Fence, which you can make yourself.
After you have made a few practice cuts, make up these “helpers”
before starting any projects. Make the “Push Stick” first.
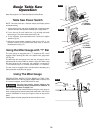
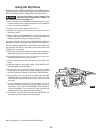
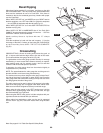
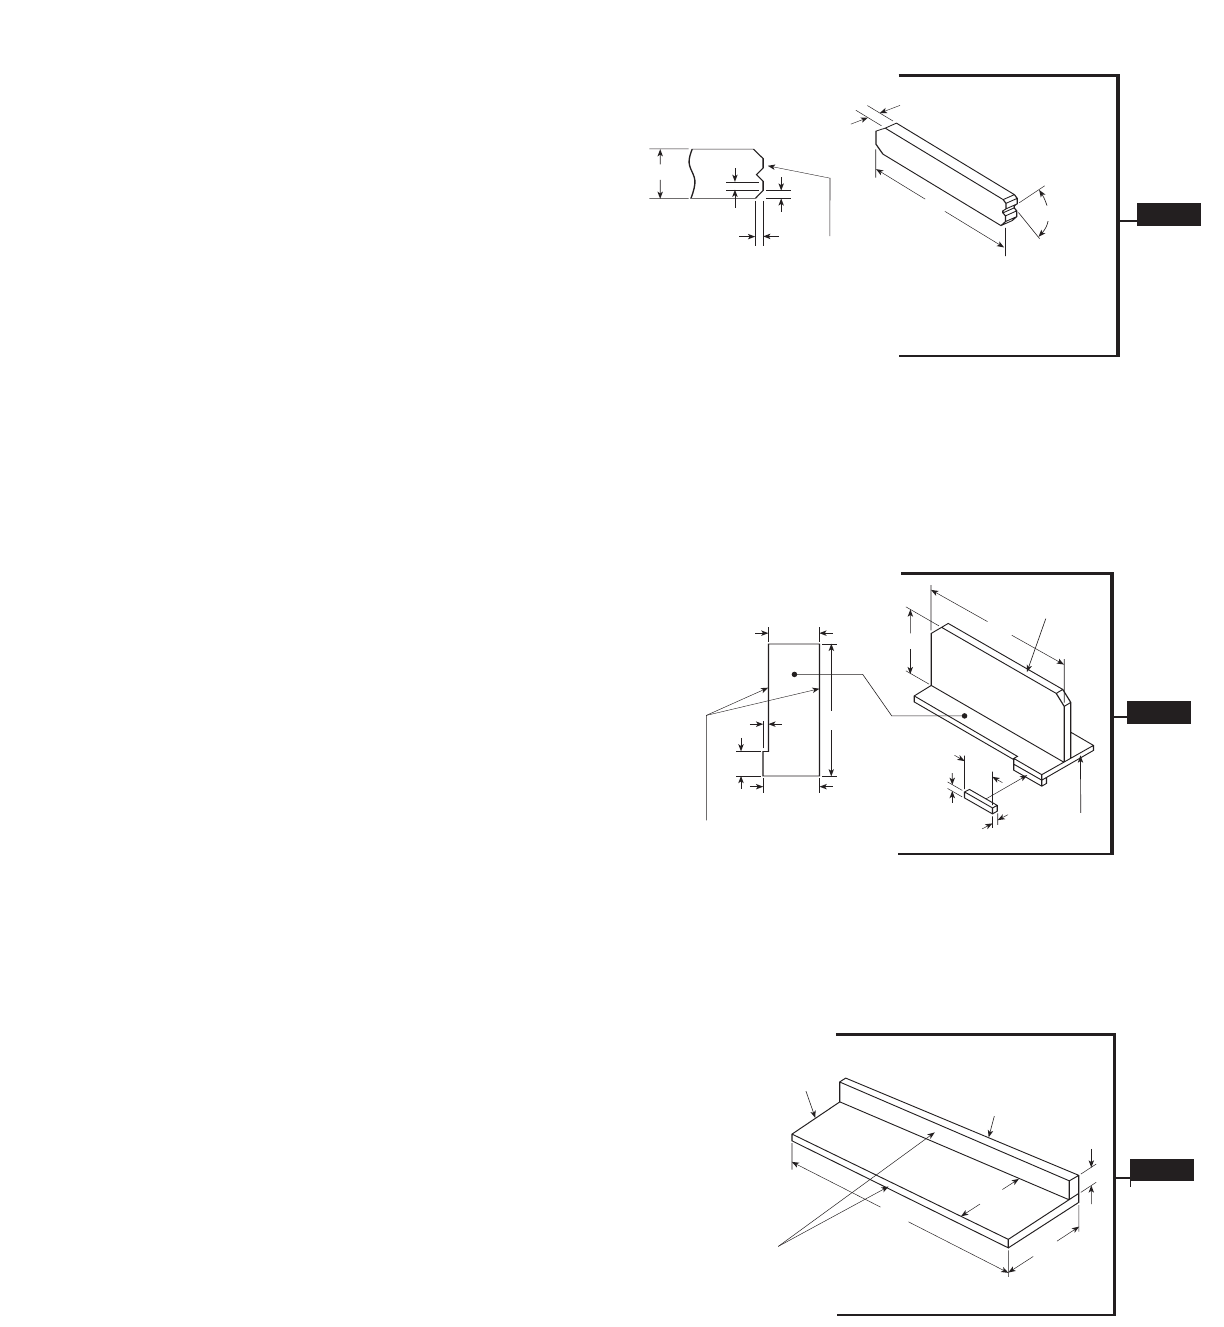
Push Stick and Push Block
Make the Push Stick using a piece of 1 x 2 as shown (Fig. 53).
Make the Push Block using pieces of 3/8" plywood and 3/4"
hardwood (Fig. 54).
The small piece of wood, 3/8" x 3/8" x 2-1/2", should be GLUED to
the plywood … DO NOT USE NAILS. This is to prevent dulling the
sawblade in the event you mistakenly cut into the Push Block.
Position the handle in the center of the plywood and fasten
together with glue and woodscrews.
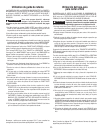
Auxiliary Fence
Make one using pieces of 3/8" plywood 3 and 3/4" hardwood 4.
Fasten together with glue and woodscrews (Fig. 55).
NOTE: Since the Push Block is used with the Auxiliary Fence, the
4-3/4" dimensions must be held identical on both the pieces.
Note: See pages 5-7 for Table Saw Specific Safety Rules.
FIG. 54
3
4
THESE EDGES
MUST BE PARALLEL
CES BORDS DOIVENT
ÊTRE PARALLÈLES
ESTOS BORDES DEBEN
SER PARALELOS
4
-3/4
"
5"
12"
12"
2-1/2"
3/8"
3/8"
3/8"
5-1/8"
2-1/2"
FIG. 55
NOTE: All dimensions in inches.
REMARQUE : Toutes les dimensions sont en pouces.
NOTA: Todas las dimensiones están en pulgadas.
THIS FACE AND
THIS EDGE MUST
BE PARALLEL
CETTE FACE ET CE
BORD DOIVENT ÊTRE
PARALLÈLES
ESTA CARA Y ESTE
BORDE DEBEN SER
PARALELOS
4
3
1-3/4"
5-1/2"
4-3/4"
19"
FIG. 53
45° NOTCH
ENCOCHE À
45°
MUESCA DE
45°
WORKPIECE
END
EXTRÉMITÉ
CONTACT AVEC
L’OUVRAGE
EXTREMO DE
LA PIEZA DE
TRABAJO
1
/4
"
1
/4
"
1
/4
"
3/4"
15"
FIG. 53
FIG. 54
FIG. 55