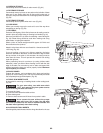
7.
L
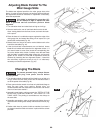
ower the blade below table surface, remove the guard
system, clamp feather boards or other fixture to hold
workpiece down, and against the fence. Place the
w
orkpiece on the tabletop at the desired location.
S
tart the
saw and let it come to full operating speed then slowly raise the
blade until it pierces the workpiece and then push the
w
orkpiece through the desired length. To stop the cut, shut off
the saw, lower the blade and remove workpiece. Repeat as
necessary to complete all sides of the pocket cut. REMEMBER
t
he guard has been removed! Pay attention to the proximity of
your fingers to blade.
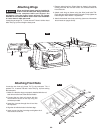
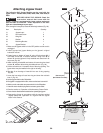
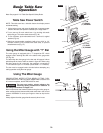
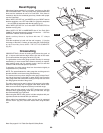
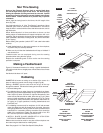
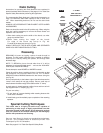
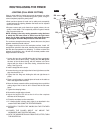
Non-Through Cutting
(Dado, Rabbet, Resawing)
U
se extra precautions when performing “Non-Through”
sawing operations that require the removal of the guard!
Remember that removing the hood guard assembly also
removes the anti-kickback devices, the spreader and anti-
kickback pawls! Immediately replace guard assembly
(guard, splitter and anti-kickback pawls) after special
applications that cannot use the guard assembly such as
resawing, dadoing, rabbeting or molding.
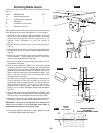
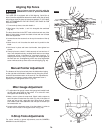
For all non-through cutting, the operator must use feather
boards to reduce the hazard from a kick back! Use feather
boards to help guide and stabilize cutting so you can
concentrate on the cutting action. Feather boards can be
used to “hold” the work down on the table and at the side of the
work to “slow” the workpiece should a kickback occur. Feather
boards are not replacement for a guard and they cannot keep
your fingers from accidentally contacting the blade. Feather
boards should be set with the feathers/fingers just ahead of the
blade teeth cutting action, pushing the wood against the fence,
but not pressing the wood into the side of the spinning blade.
Use the fence to guide and support the work past the saw
blade.
Unsupported cuts will shift and may cause the work to
be thrown backward.
B
e aware of proximity of you hand/fingers to the cutting
tool.
Non-through cuts are “blind cuts”, use push sticks to
move the work through the cutter.
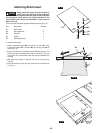
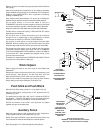
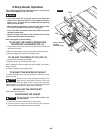
Use the proper table insert for the width and diameter of
the dado blade or molding head.
Dado blade stack or
molding head is wider than the slot of the standard table insert.
T
hese blades will strike and damage the standard insert and
cause severe injury by throwing the insert against the operator.
D
o not bevel with dado blades or molding heads.
T
hese
accessories are designed for perpendicular non-through
cutting.
Do not elevate the dado blade so that the hub protrudes
above slot of the table insert.
Contact with hub will cause
the workpiece to be unstable as it passes through the cut and
possibly kickback.
Don’t force the workpiece through the dado blade. Dado
blades create wide non-through cuts that require the operator
to feed the work slowly and use of feather boards and positive
downward pressure on the workpiece to avoid loss of control.
Do not back up or pull the workpiece back (reverse feed)
when resawing.
Pulling the workpiece backward could cause
kickback.
Table saws are highly versatile products capable of
performing variety of operations.
There are too many
applications to be fully addressed in this manual. Go to the
library, home center, hardware or bookstore to learn about the
many applications of a table saw; we suggest obtaining
woodworking books like “The Table Saw Book” by Richard
J.
de Cristoforo or similar publications addressing your
particular
needs.
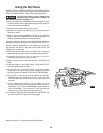
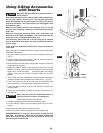
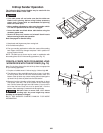
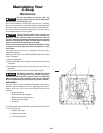
X-Shop Safety Rules
Accessory Power Outlet
Only use the accessory power outlet to power tools designed
for and properly installed in a properly assembled power tool
table.
Do not use the accessory power outlet to power tools not to
be used on the X-Shop.
Table Saw / Accessory Switch
The table saw /accessory switch only determines whether
the main table saw or the accessory power outlet can be
turned on by the main on/ off switch. Be aware of the
position of the table saw / accessory power outlet switch
before turning on the main power switch.