


X-Shop Router Operation
The following Skil Router Models may be used with the
router insert: Models 1810, 1815, 1820.
• Turn main power off and make sure that the table saw
blade is not spinning before using X-shop accessory
power tools. Contact with an unattended and spinning
blade can cause injury.
• Before making adjustments, make sure the router switch
is in the OFF position and the cord is unplugged.
•
Lower the table saw blade below table before using the
accessory power tools.
• Remove X-Shop tool inserts and reinstall blank inserts
before returning to table saw operation.
Note: See page 8 for Router Safety.
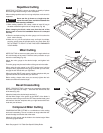
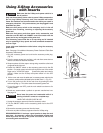
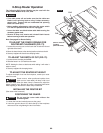
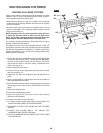
TO ADJUST THE FENCE OPENING FOR
ROUTER BIT CLEARANCE (FIG. 73)
1. Loosen the two wing nuts on the back side of both the left and
right side of the fence.
2. Move the lower fences to the desired position relative to the bit.
3. Securely retighten the face fence clamping knobs.
TO ADJUST THE DEPTH OF CUT (FIG. 73)
1. Loosen the two clamping knobs R10.
2. Slide the fence in or out relative to the cutter.
NOTE: Holding the fence at both ends while sliding it will make it
easier to move.
3. Securely retighten the clamping knobs.
TO ADJUST THE ROUTER BIT HEIGHT
To adjust the depth of cut into the workpiece, consult your router
owner’s manual.
Some routers, when positioned upside down
(such as on a router table), will drop or fall out of
the router base when the base clamp is loosened to adjust the
height or depth of cut. Be sure the router is supported from below
when adjusting or whenever the base clamp is loosened.
INSTALLING THE ROUTER BIT
(See router owner’s manual.)
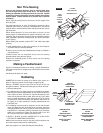
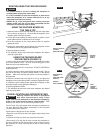
POSITIONING THE GUARD
Do not use the router table without the
overhead guard.
1. Loosen the front two knobs that secure the guard.
2. Lower the guard to about 1/8” above the top of the workpiece
and secure it be re-tightening the two front knobs.
90
.
FEEDING DIREC
TION
R10
R10
R10
R10
WARNING
!
FIG. 73
(SENS DE L’AVANCE DE
L’OUVRAGE)
(
SENTIDO DE AVANCE)
WARNING
!
WARNING
!