


6. Tighten the four wing nuts holding the left and right fences in
p
lace.
7
. Adjust the fence inward or outward to obtain the proper depth-of-
cut.
8. Tighten the fence clamping knobs.
9. Adjust the height of the bit to obtain the desired height-of-cut.
(Adjustment is made with the router.)
1
0. Lower the guard about 1/8” above the workpiece and tighten
the knobs.
11. With the workpiece away from the bit, TURN THE
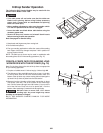
ROUTER ON.
12. While firmly holding the workpiece down against the router
table, gradually and slowly feed the workpiece toward the bit
until it contacts the pilot.
13. While firmly holding the workpiece against the pilot and down
against the router table, feed the workpiece through the bit in
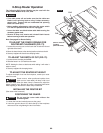
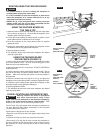
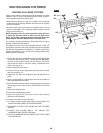
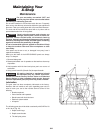
the direction shown by the ARROW in Fig. 73.
14. For deep cuts, do not try to cut the total depth all in one pass.
Repeat the cut taking smaller cuts.
GROOVING, FLUTING, AND VEINING
1. Make sure that the left fence lines up with the right fence. If the
jointing shim is installed, remove it before proceeding.
2. The bit must be of the point-cutting or end-cutting type. Do
not use any other type of bit.
3. Loosen the wing nuts and adjust the left and right fences so that
they clear the bit by 1/4”.
4. Tighten the four wing nuts holding the left and right fences in
place.
5. Adjust the fence inward or outward to obtain the proper location-
of-cut.
6. Tighten the fence clamping knobs.
7. Adjust the height of the bit to obtain the desired height-of-cut.
(Adjustment is made with the router.)
8. If you are using the feather boards, adjust them as described in
the section, ROUTING USING THE FEATHER BOARD.
9. LOWER THE GUARD ABOUT 1/8” ABOVE THE WORKPIECE
AND TIGHTEN THE KNOBS.
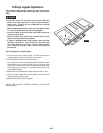
10. With the workpiece away from the bit, TURN THE
ROUTER ON.
11. While firmly holding the workpiece against the fence and down
against the router table, feed the workpiece toward the bit in
the direction shown by the ARROW in Fig. 73.
12. For deep cuts, do not try to cut the total depth all in one pass.
Repeat the cut taking smaller cuts.
NOTE: SEE ROUTER OWNER’S MANUAL FOR MORE
INFORMATION.
98
.