


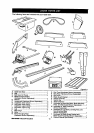


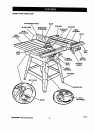


Assembly isbest done inthe area where the saw will be used. When you remove the table saw base, loose
parts, and hardware fromthe packingmatedals, check all items with the loose parts listand drawing. Ifyou are
unsure about thedescriptionofany part, refer tothe drawing. If any parts are missing, delay assemblinguntil
you have obtainedthe missingpart(s).
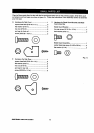
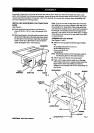
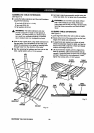
INSTALLING HANDWHEELS ON TABLE SAW
BASE
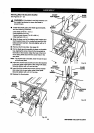
See Figure 6.
• Each handwheel bag containsa handwheel, a
screw (3/16-24 x 1/2 in.), and a flat washer (3/16
in.).
• Alignhandwheelsto theshaftendsthatextendfrom
thefrontand rightsideofthetable sawbase. Match
thefiat spotsonthe shaftand insidethe handwheeL
Inserta screwand a fiatwasherin thehandwheel
centerandtightenwitha 4 mmhex key.
HANDWHEEL
Note: Ifyou do not usa the leg stand and mountthe
saw table base on a bench insteadof the legs, goto
the procedurefor Assembling TableExtensions. Be
sure the'bench surfacehas an openingfor sawdustto
fall through.The opening shouldbe as large as the
opening in the bottomofthe saw table base, A height
of 36 inchesfromthe top ofthe saw table to the floor
is recommended.
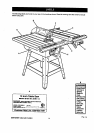
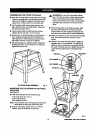
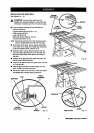
ASSEMBLING LEG STAND
See Figures 7 and 8.
• Take fromthe legstand hardware bag thefollow-
ing:
24 carriagebolts(5/16,18 x 3/4 in.)
32 flatwashers (5/16 in.)
32 hex nuts(5/16-18)
4 levelingfeet
Note: Remaininghardwarefrom thisbag is usedfor
mountingleg standon the table saw base.
• Take 4 legs and 8 bracesfrom looseparts.
• Place a shortupper brace insidetwo ofthe legs,
withthe legswide end up. (Upper braceshavetwo
largeholes in each end.) Make sure the two
dimplesonthe leg alignwith the twosmall holeson
each brace.
TABLE WASHER
SAWBASE SHAFTEND SCREW
Fig. 6
UPPERBRACE
HEXNUT
%
WASHER
CARRIAGE
LOWERBRACE
LEG
[RRFTSMIIN" TABLESAW315,228310
HEXNUT
LEVELINGFOOT_ Fig. 7
18