


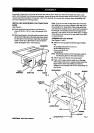
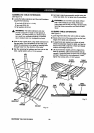

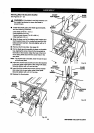


ALIGNINGTHERIPFENCEANDFRONTRAIL
See Figures 17and 18.
The ripfence scale indicatoris installedon the right
side ofthe ripfence but can be removed and rein-
stalledon the left side if needed. If a cuttingoperation
requiresplacing the rip fence on the left side of the
blade, and you find relocatingthe scale indicator
necessary,simply unscrewand re-attach it.
• Hookthe back of the rip fenceover the rear rail.
Lowerthe frontof therip fence into the grooveon
thefront rail.
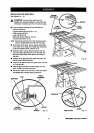
• Slidethe rip fence back and forth. Itshouldmove
freely withabout 1/16 in. clearance between the rip
fence and table surface.If it doesn't,loosenthe
nuts holdingthe frontrail and adjust itup or down.
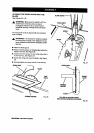
• Remove the rip fence and repeat on other side of
the blade. When the fence rides smoothly,
tighten all rail hex nuts with a 12 mm wrench.
• Attachthe end capsand s_rews witha phillips
screwdriver.
NCE
oo
REARRAIL Fig. 17
TOINSTALL
SCALEINDICATOR
ONLEFT
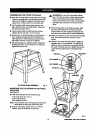
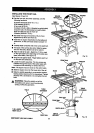
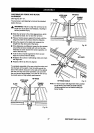
MOUNTING THE MOTOR
See Figure 19.
• Locatethe motorassembly,the motormounting
plate and the followinghardware:
4 hex bolts(5/16-18 x 1 in.)
8 flat washers (5/16 in,)
4 lockwashers (5/16 in.)
4 hex nuts(5/16-18)
2 hex bolts(5/16-18 x 5/8 in.)
Note: Remaininghardwarefromthis bag is used for
installingthe belt guard.
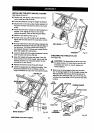
• Release the bevel lock handle (frontof cabinet)
and turnthe bevel handwheel (sideof cabinet) until
the blade isfullyvertical. Retightenthe bevel lock
handle.
• Alignthe holes inthe motormountingplate and the
motorbracketso thetop edges are even. Placea
flat washer on the 1 in. boltsand insertinto the
holes.
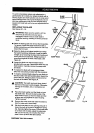
• Installa flatwasher, lockwasher, and a hexnut on
each belt. Hand tightenonly.This isthe motor
supportassembly.
• Center the motorside to side on the motormount-
ingplate. Tighten the nutswitha 12 mm wrench.
• Insertthe two rodson the motorsupportassembly
intoholes in the cradle. Pushthe motorin as far as
itwill go. Thread the two hex boltsintothe cradle
to clamp downon the rods. Do not securely
tighten bolts yet.
HEXBOLTS
RODS
RIPFENCE
FRONTRAIL
MOTOR
BRACKET
MOTOR
ASSEMBLY
1 In.HEXBOLTS
WASHER
Fig. 18 Fig. 19
23 CRRFTSNRN"TABLESAW315.228310