


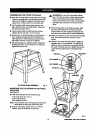
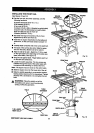


ASSEMBLINGLEGSTAND(Continued)
• Alignthetwo large holeson the brace and the legs.
Insertthe cardage bolts.Addflatwashersand hex
nuts and handtighten. Repeat forthe othershort
upper brace. These are the frontand backsets.
• For the sides,installa long upperbrace on two
legs.Add hardware and fingertighten.Repeat for
the otherlong upperbrace.
• Use the same steps to installthe lower braces.
Tightenall hex nutswith a 12 mm wrench.
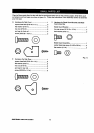
• Place a hex nut and flat washer on each leveling
foot.installthe levelingfeet fromthe bottomof
each legwith the boltspointingup. Secure witha
fiatwasher and hex nutbut do nottighten.
• Move the leg standto desiredlocation.Adjustthe
levelingfeet witha 12 mmwrench, then securely
tightenthe top hex nut.
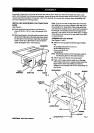
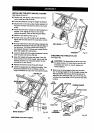
_k WARNING: Do notliftthe saw table without
help. The table saw baseweighs approximately
95 Ibs.Hold itcloseto yourbody. Keep your
kneesbent and liftwith yourlegs, notyourback.
Ignoringthese precautionscan resultin back
injury.
• Place the legstand on the table saw base. Align
the holesinthe tablewith theholes in theend
braces.Make surethe Craftsmanlabelfaces the
front ofthe saw (same sideas heighthandwheel).
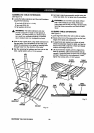
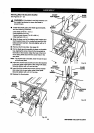
• Place a flat washeron each bolt and insertthrough
hole. Adda flat washerand a hex nut. Hand
tighten.
• Repeat for thethree remainingholes.Tighten all
hardwarewith a 12 mmwrench. You may find it
helpfulto use two wrenches,one wrenchtohold
the head ofthe boltand one to tightenthe hex nut.
Leavethe saw upsidedownto add table exten-
sions.
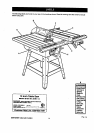
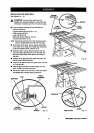
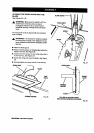
HEXI, LEGSTAND
LEGSTANDSHOWNASSEMBLED Fig.8
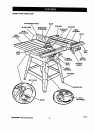
MOUNTING THE LEG STAND ON THE TABLE
SAW BASE
See Figure 9.
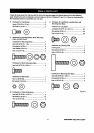
• Take the followingfrom the hardwarebag:
4 hex bolts(5/16-18 x 1/2 in.)
4 hex nuts (5/18-18)
8 flatwashers (5/16 in.)
Note: This hardwarewas inthe bagwith hardwarefor
assemblingthe leg stand and levelingfeet.
• Place the saw table upsidedownon a smooth
surface,such as cardboard, on the floor.
Fig. 9
19 CRAFTSMRN"TABLESAW315.228310