


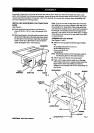
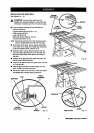

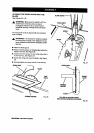


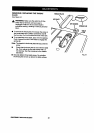

INSTALLING THE BLADE GUARD
See Figures23 - 25.
WARNING: Ifthe blade is not fully lowered, tum
the heighthandwheel to lower theblade to
preventinjury.
• Locatethe blade guard, the blade guardbracket,
and the followinghardware:
2 hex bolts(5/16-18 x 1/2 in.)
2 lockwashers (5/16 in.)
3 sockethead screws(1/4-20 x 3/8 in.)
3 fiatwashers (1/4 in.)
• Alignthe lowerend of the blade guard bracketand
the threaded holesof the cradle and insertthe hex
boltsand _ockwashers.Securely tk3htanwith a 12
mm wrench.
• Remove thethroat plate. See page 32.
• Putthe bladeguard assemblyin place on thetable
top,aligningthe screwholes inthe rivingknifeto
the holesin the bracket.Alignthe holeinthe front
of the rivingknifebase withthe screw holein the
saw table.
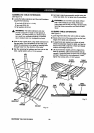
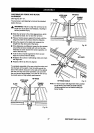
Note: The screwhole islocated undertheslot in back
ofthe throat plate.
• Inserttwo sockethead screws and two flatwashers
inthe two holesat the beck ofthe dyingknifebase.
Securelytightenwith a 5 mm hex key.
• Insertthe thirdsocket head screwand flat washer
intoscrew holein saw table underthroatplate.
Securelytightenwith a 5 mm hex key.
• Replacethe throat plate.
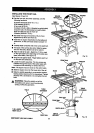
SOCKET
HEADSCREWS
FLM
WASHER
SOCKET
HEADSCREW
FLAT
RIVING
KNIFE
BLADE
Fig. 24
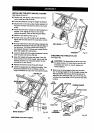
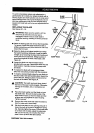
BLADE
BLADE
GUARD
BRACKET
_NTI-KICKBACK
PAWLS
LOCK
WASHER
HEX
Fig. 25
Fig. 23
25 CRRFTSNnN"TABLESAW315.228310