


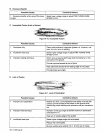


3.
If
door
has
an
outer
panel
reinforcement,
break
the
weld.
4.
Grind
off
the
hem
flange
and
remove
the
old
panel.
5.
Repair
any
damage
to
the
inner
panel.
6.
Position
the
new
outer
panel
over
door
and
bend
the
end
flange
over
the
inner
flange.
7.
Spot
weld
outer
panel
reinforcement
to
new
door
panel.
Spot
weld
new
hem
flange
to
inner
panel.
Metal
finish
exterior
surface,
paint
and
assembly
interior
trim
and
hardware.
10-4.
HOW
TO
PREVENT
GLASS
BREAKAGE
AND
SPATTER
ON
WINDOWS
Spatter
and
excessive
heat
can
become
problems
when
welding
near
windows.
Protect
the
windows
by
keeping
them
covered
and
as
far
away
from
the
heat
zone
as
possible.
When
welding
must
be
performed
near
win
dows,
the
windows
should
be
covered
and
protected
from
excessive
heat
by
using
wet
rags.
A
putty
like
sub
stance
which
reduces
heat
transfer
is
available
through
your
welding
supplier,
If
burn
through
and
spatter
be
come
problems,
ensure
that
the
correct
voltage
tap
is
being
used
for
the
size
material
being
welded.
Use
an
ar
gon
and
002
gas
mixture
and
check
travel
speed.
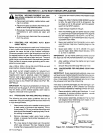
10-5.
PROCEDURES
FOR
WELDING
FENDERS
AND
QUARTER
PANELS
When
a
complete
panel
must
be
replaced
it
will
be
nec
essary
to
remove
the
bolts
securing
the
panel
to
the
rest
of
the
structure,
or
to
cut
through
the
spot
welds
if
the
panel
is
welded
in
place.
In
most
cases
a
front
fender
will
be
bolted
in
place,
while
the
other
panels
will
be
either
spot
welded
or
continuous
seam
welded.
The
alignment
of
front
fenders
is
usually
simple
because
the
bolt
holes
are
often
elongated
so
that
the
position
of
the
new
front
fender
can
be
shifted
and
correctly
aligned.
Generally
all
other
panels
are
welded
into
place.
If
the
whole
panel
is
to
be
replaced,
the
old
panel
must
be
removed
by
cutting
along
the
weld
if
welded
by
continu
ous
seam,
or
by
drilling
out
the
spot
welds
if
it
is
spot
welded
in
place.
Car
and
body
manufacturers
have
the
panels
welded
in
different
places,
so
it
will
be
necessary
to
inspect
the
body
to
determine
where
the
welds
are
lo
cated
in
each
case.
After
the
old
panel
is
removed,
the
inner
panels
must
be
carefully
checked,
straightened
or
replaced.
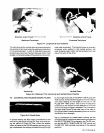
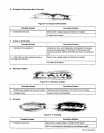
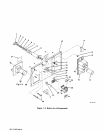
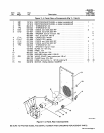
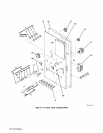
Figure
10-3.
Automotive
Body
Sections
Assembled
With
Continuous
Seam,
Pulsed,
And
Spot
Welds
S
-04
20
The
new
outer
panel
can
then
be
placed
and
held
in
posi
tion
by
vice-grips
or
c-clamp.
When
welding,
start
at
the
center
and
proceed
first
in
one
direction
and
then
the
other.
In
order
to
ensure
reduced
distortion
due
to
heat,
weld
only
a
section
of
2
or
3
in.
(51-76
mm)
at
a
time.
It
is
important
to
constantly
check
the
over
all
temperature
of
the
sheet
steel
around
the
welding
area,
because
it
is
in
this
concentrated
heat
area
that
warpage
and
distortion
will
begin.
Leave
a
gap
and
then
weld
another
short
sec
tion.
When
the
weld
is
completed
it
can
be
hammered
down,
filled
with
body
putty
and
sanded.
10-6.
WELDING
FRAMES
AND
HIGH
STRENGTH
(HSS)
STEELS
The
new
HSS
steels
are
used
on
many
of
the
new
econ
omy
compact
cars.
HSS
steels
can
be
found
in
the
steel
gussets,
brackets,
floor
pans,
and
support
members
of
these
new
models.
HSS
steels
are
thinner
for
weight
re
duction
and
are
heat
sensitive.
As
heat
is
applied,
the
strength
decreases
and
cracking
can
occur,
therefore
the
heat
affected
zone
must
be
kept
as
small
as
possi
ble.
For
this
reason
the
MIG
welding
process
has
be
come
the
preferred
method
for
welding
HSS
steels,
and
the
oxyacetylene
welding
or
brazing
processes,
with
its
wider
heat
affective
area,
are
normally
not
recom
mended.
8.
9.
Continuous
Seam
Weld
Pulsed
Seam
Welds
Spot
Weld
On
Outer
Panel
Reinforcement
Spot
Welds
Inner
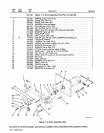
Figure
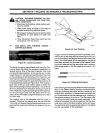
10-2.
Hem
Flange
Removal
S
.04
19
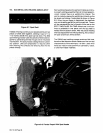
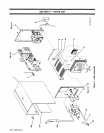
Figure
10-4.
Application
Of
Body
Putty
OM-113
336
Page
41