


882.00207.00 Chapter 7: Appendix 99 of 102
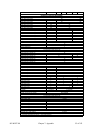
Alarm Number Explanation:
The alarms are given in individual bits and are reflected in the alarm number. The alarm number is only
used to drive a pop-up message and will probably not be very useful to you. If you decide to use the
alarm number instead of reading the individual alarm bits then the related values are shown below:
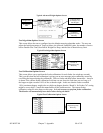
D1876 Value Alarm Description
0= NO ALARM
1= HOPPER 1 Out of Material 1
2= HOPPER 2 Out of Material 2
3= HOPPER 3 Out of Material 3
4= HOPPER 4 Out of Material 4
5= HOPPER 5 Out of Material 5
6= HOPPER 6 Out of Material 6
7= POWER INTERRUPTION while metering a Batch
8= PLC BATTER LOW Check PLC and Configure the Blender
9= MAX HOPPER WEIGHT EXCEEDED. CHECK BATCH SIZE
10= CALIBRATION ERROR. Clean out weigh hopper and check calibration
12= HOPPER 1 Low Level
13= HOPPER 2 Low Level
14= HOPPER 3 Low Level
15= HOPPER 4 Low Level
16= HOPPER 5 Low Level
17= HOPPER 6 Low Level
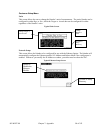
FIXED DECIMAL EXPLANATION
All weight values and recipe values use fixed decimal. This must be taken into consideration when
writing or reading values. If you see “xxx.xxx” above this means the data is in fixed decimal and must
be scaled when reading or writing. A decimal is shown next to each item to represent the format.
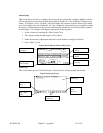
WRITING RECIPE EXPLANATION
To write a recipe you must first write to the “temp recipe” value locations above. After this is complete
you should read the “accept recipe enabled” and the “recipe error” values. If you have a recipe error
then you should display the appropriate text. If the “accept recipe enabled” is high then show a button
that will then write to “accept recipe” bit. This will load in the recipe. You do not need to check the
sum of the recipe that they’ve entered. The blender will do that for you.