


882.00207.00 Chapter 3: Installation 43 of 102
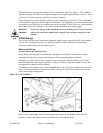
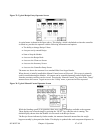
Additional Setup Parameters
The settings listed below are set at the factory and typically do not require any change.
1. From the “Recipe” Page, touch the Manufacturer’s icon and enter “5413”, then press the
“Enter” key.
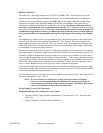
2. Touch the “Mixer and Dump Setup” key to enter the amount of time the mixer will mix or
the batch is dumped.
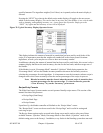
3. Enter a “Mixing Time” by pressing the number next to “sec”, this is the amount of time to
run the mixer after a batch is dumped into the mixing chamber. Remember that if the mix
time is too long you may get material separation.
4. Press the number next to “sec” on the “Remix Time” to set “Re-mix” off time. This allows
the mixer to come on between batches if the blender cycle time is very slow (i.e. if you want
the mixer to come on every minute, set this to 60 seconds). If you don’t want to use this
function, set the time to “0”.
5. Press the number next to “sec” on the “Dump Time” to set your dump time (A value
between “1” and “999” will need to be entered.). This feature is the amount of time required
to empty the batch hopper. (Set the time so that all the material in the weigh hopper has a
chance to be evacuated).
6. Press the number next to “sec” on the “Dump Delay” line for the optional dump delay
setting. This is the amount of time to start the mixer prior to dumping material into the
mixing chamber. Set to “0” to disable this feature.
7. Press the number next to “Dump Cycles” to enter the number of times that material will be
dumped from the weigh hopper. This allows the dump valve to open and shut repeatedly
when the weigh hopper is empty to shake loose any sticking material. If this feature is set to
“1” then the batch will dump normally.
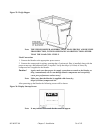
8. Press the number next to “sec” on the “Mixer Dump Time” to enter the amount of time that
the mixer will run while dumping material out of the knife gate below the mixer. This
feature assists in cleaning out the mixer.
9. Press “Done” to return to the “Setup” screen.
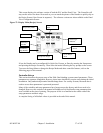
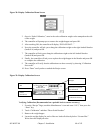
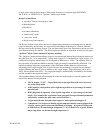
10. Press “Alarm Setup” on the “Setup” screen to look at the “Alarm Flags & Feeder Setup
screen.”
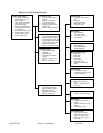
11. This screen allows you to change the way alarms on each feeder function. Enter the feeder
you wish to configure by pressing the corresponding feeder number under “Select Feeder.”
You can select “Stop if “Out of Material” which means if there is any kind of alarm on this
feeder, the blender process will stop (i.e. the feeder supply hopper is out of material.) You
can also set it to “Continue if “Out of Material.” This mode will alarm but let the blender
continue to operate or you can set it to “No Alarm on Out of Material” mode. “No Alarm”
mode does not set off any alarms. In addition, an “Out of Material Alarm Silence Delay”
specifies the amount of time before an alarm will be set off.
12. Press “Done” to return to the “Setup” screen.
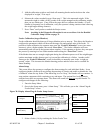
Note: If the controller is set to Continuous Mixing, then the blender will run
continuously while the blender is operating. If it is set to “Timed Mixing” then
the mixer will run for the “Mixing Time” setting when a batch is dumped into
the mixer.