


22 Chapter1
LVD Product Information
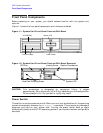
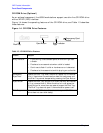
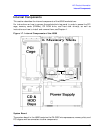
Front Panel Components
Step 2
• Reduce any logical volumes that have mirror copies on the faulty disk so that they no
longer mirror onto that disk (note the -A n option). This will take a several minutes.
lvreduce -m 0 -A n <
LV name
> /dev/dsk/<
hard drive
>
(for 1-way mirroring)
For example:
lvreduce -m 0 -A n /dev/vg00/stand /dev/dsk/c2t5d0
lvreduce -m 0 -A n /dev/vg00/swap /dev/dsk/c2t5d0
lvreduce -m 0 -A n /dev/vg00/ /dev/dsk/c2t5d0
The number of logical volumes that this step needs is variable. For instance, on a mirror
of a root disk you should have at least three logical volumes: /stand (is
lvol1), /swap (is lvol2), and / (is lvol3). Note that if your root mirror disk dies,
you need to do the following:
— Follow the procedure in the section “Initial System Loader (ISL) Environment” in
the chapter “Boot Console Handler” in this document. At the Main Menu prompt
boot from the good disk.
— Type y at the Interact with ISL prompt and press
Enter.
— Type this command at the ISL prompt and press
Enter: hpux -lq
The -lq option stands for loss of quorum. Once this procedure has been completed the
system will boot.
Step 3
• Replace the faulty disk.
•Doanioscan on the replaced disk to insure that it is accessible and also as a double
check that it is a proper replacement.
For example:
ioscan /dev/dsk/c2t5d0
Step 4
• Restore the LVM configuration/headers onto the replaced disk from your backup of the
LVM configuration:
vgcfgrestore -n <
volume group name
> /dev/rdsk/c
x
t
x
d
x
where x is the logical unit number of the disk that has been replaced.
For example:
vgcfgrestore -n /dev/vg00 /dev/rdsk/c2t5d0