


82 Chapter3
System Upgrades
System Upgrades
Installing and Removing the Hard Disk Drives
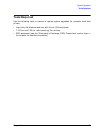
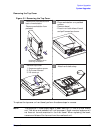
To install the hard disk drives, perform the following steps. You should make sure that the
disks are firmly seated. Reinstall the hard disk drive cover and optional locking
thumbscrew, if applicable.
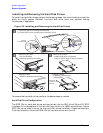
Figure 3-2. Installing and Removing the Hard Disk Drives
To remove the hard disk drives, perform the above steps in reverse.
Hard Disk Drive Configuration
The SCSI IDs for hard disk drives are hard-wired into the SCA Ultra2 Wide LVD SCSI
interfaces in the backplane of the two disk bays within the J6000 workstations. Hence,
SCSI IDs do not need to be set for the hard disk drives installed in these workstations.
From top to bottom, the pre-set SCSI IDs for hard disk drives are: 6 and 5.
1
2
3
1. Remove optional locking thumbscrew
2. Press HDD cover release tab to remove cover
Removing a HDD
- Install hard drive in bracket
- Insert in HDD cage till firmly seated
Carefully
remove and
discard
Removing a HDD
- Pull out bracket
- Remove bracket and HDD
Locking
Thumbscrew
1
2
Adding a HDD
- Remove bracket and screws
Adding a HDD
- Carefully remove bar
- Install HDD