


Chapter 3 83
System Upgrades
System Upgrades
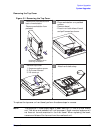
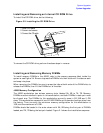
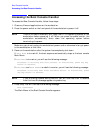
Installing and Removing an Internal CD ROM Drive
To install the CD ROM drive, do the following:
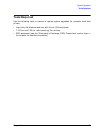
Figure 3-3. Installing the CD ROM Drive
To remove the CD ROM drive, perform the above steps in reverse.
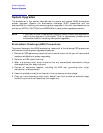
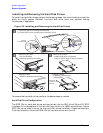
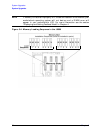
Installing and Removing Memory DIMMs
To install memory DIMMs in the J6000, refer to the memory sequence label inside the
system or see Figure 3-4. Be sure to press the DIMMs into their slots until the tabs on each
end snap into place.
When removing the DIMMs, be sure to press the tabs at both ends of the DIMM slots to
release the DIMMs, then lift the DIMMs out of the slots.
J6000 Memory Configuration
The J6000 workstation has sixteen memory slots, labeled 0A, 0B to 7A, 7B. Memory
DIMMs must be installed in pairs in this workstation, and both DIMMs in each pair must
be of equal size. The DIMMs for this workstation currently come in 512 MB and 1 GB
sizes. This workstation comes with two 512 MB DIMMs as its standard configuration from
the factory. Thus, currently the minimum memory configuration for this workstation is
1GB, and the maximum is 16 GB.
DIMMs should be loaded in the order shown with 0A, 0B being the first pair of DIMMs
loaded, and 7A, 7B being the last pair loaded. Figure 2-1 shows the installation sequence.
1. Slide CD in place
2. Screw in two screws
3. Connect the CD cable
1
2
3