


F-46 F-46
INPUT CONTACTOR CLEANING AND/OR REPLACEMENT (Continued)
TROUBLESHOOTING & REPAIR
MULTI-SOURCE
Return to Section TOC Return to Section TOC Return to Section TOC Return to Section TOC
Return to Master TOC Return to Master TOC Return to Master TOC Return to Master TOC
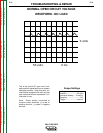
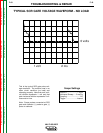
T3
T2
T1
U
V
W
TOP VIEW
REMOVAL PROCEDURE
1. Disconnect input power to the machine.
2. Remove case sides and roof using a 3/8”
nut driver.
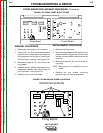
3. Label leads T1, T2, T3, U, V, W and their
respective terminals. See Figure F.19.
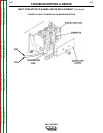
4. Using a 11/16” nut driver, remove the six
leads connected to the input contactor.
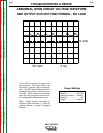
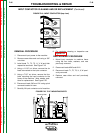
5. Using a 7/16” nut driver, remove the four
bolts mounting the input contactor to the
frame of the machine. Note washer posi-
tions for replacement. See Figure F.20.
6. Disconnect leads 240 and 241 using quick
connects located in loom.
7. Carefully lift input contactor out of machine.
8. For contactor cleaning or inspection see
Figure F.21.
REPLACEMENT PROCEDURE
1. Mount input contactor to machine frame
using the four bolts, washers, and nuts
previously removed.
2. Reconnect leads #240 and #241.
3. Reconnect leads T1, T2, T3, U, V, W previ-
ously removed.
4. Replace case sides and roof previously
removed.
FIGURE F.19. INPUT CONTACTOR (top view)
FIGURE F.20. 7/16” MOUNTING BOLTS
LEFT SIDELEFT SIDE
Mounting Bolts