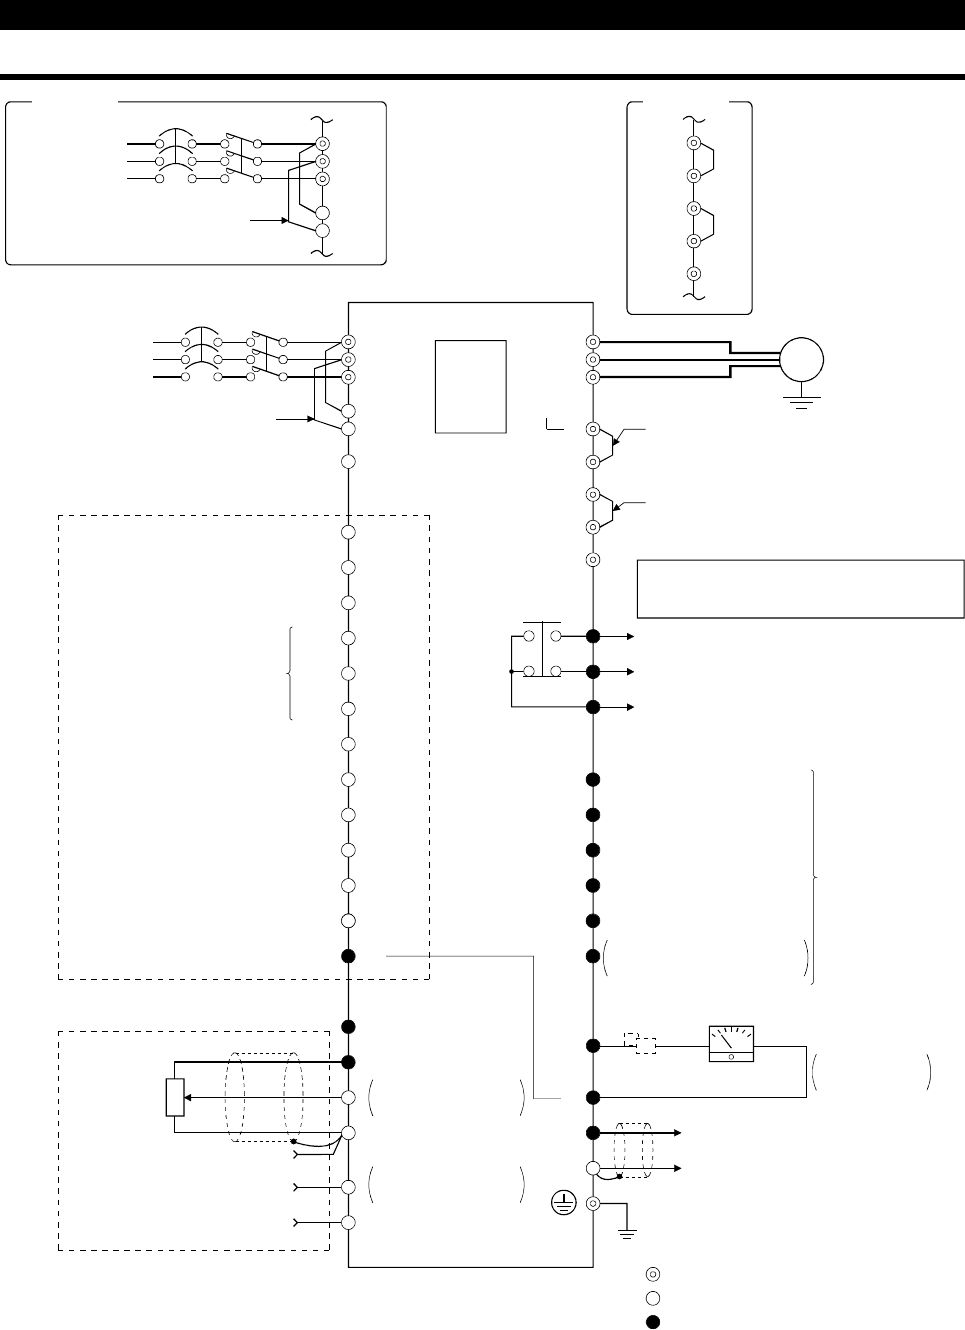
2.2 Wiring
INSTALLATION AND WIRING
9
2.2 Wiring
2.2.1 Terminal connection diagram
NFB
R
S
T
R1
S1
PC
STF
STR
STOP
RH
RM
RL
JOG
RT
MRS
RES
AU
CS
SD
10E(
+
10V)
10(+5V)
2
5
2
3
1
1
4 (4 to 20mADC)
Frequency
setting
potentiometer
1/2W1kΩ
RUN
SU
IPF
OL
FU
SE
FM
SD
IM
A
B
C
U
V
W
P1
P
PX
PR
N
+−
(
−
)
(
+
)
AM
5
Ground
Main circuit terminal
Control circuit input terminal
Control circuit output terminal
3-phase AC
power supply
Jumper
2
4VDC power output and external transistor common
(Contact input common for source logic)
Forward rotation start
Reverse rotation start
Start self-holding selection
High
Middle
Low
Jog mode
Second acceleration/deceleration
time selection
Output stop
Reset
Current input selection
Selection of automatic restart
after instantaneous power failure
(Contact input common for sink logic)
Control input signals (no voltage input allowed)
Frequency setting signals (analog)
Common
Auxiliary input
Current input
0 to 5VDC
0 to 10VDC
Selected
(Analog common)
0 to ± 5VDC
0 to ±10VDC
Selected
(Note)
(Note)
Motor
Ground
Jumper
Remove this jumper when using FR-BEL.
Jumper
Alarm output
Running
Up to frequency
Instantaneous power failure
Overload
Frequency detection
Open collector output common
Common to sink and source
Open collector
outputs
Meter
(e.g. frequency meter)
Moving-coil type
1mA full-scale
Analog signal output
(0 to 10VDC)
Multi-speed selection
PU
connector
(RS-485)
NFB
L
1
L
2
L3
L11
L21
3-phase AC
power supply
Jumper
EC version
P1
+
PX
PR
–
EC version
Note:Please do not alter or adjust terminals PR
and PX or the connecting jumper.
Calibration
resistor*
* Not needed when the operation panel (FR-DU04) or parameter unit
(FR-PU04) is used for calibration.
Used when calibration must be made near the frequency meter for
such a reason as a remote frequency meter. However, the
frequency meter needle may not deflect to full-scale if the
calibration resistor is connected.
In this case, use this resistor and the operation panel or
parameter unit together to make calibration.


