


22
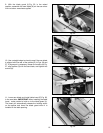
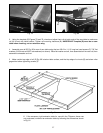
Fig. 53
Fig. 54
D
E
F
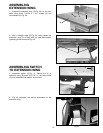
Fig. 55
J
K L
L
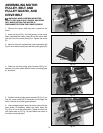
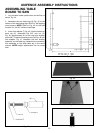
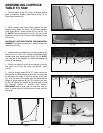
ASSEMBLING UNIFENCE
TABLE TO SAW
1. Remove screw (I) Fig. 49 (D Fig. 54) before placing
table on brackets. Position table board (A) Fig. 53 on
three angle brackets (B).
2. While holding table board firmly against the saw
adapter plate, fasten the table to the three brackets
using three #8x7/8" wood screws (D), (E), and (F), Fig.
54. NOTE: The two screws (E) and (F), Fig. 54 can be
tightened. Screw (D) Fig. 54 should be left slightly loose
at this time.
CAUTION: DO NOT OVER-TIGHTEN TABLE MOUNTING
SCREWS. Over-tightening screws in particle board may
cause them to strip.
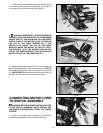
3. Assemble the two brackets (J) to the rear guide rail (K)
using the two 1/4-20 x 3/4" carriage bolts placing bolts
through holes, then washers and nuts (L), Fig. 55. NOTE:
The long leg of the brackets (J) should be against the
bottom of the table (A).
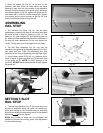
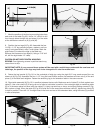
4. Fasten the table (A) to the two brackets (J) on the
rear guide rail (K) Fig. 56, using two #8x7/8" wood
screws.
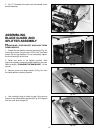
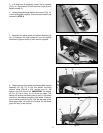
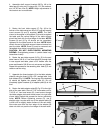
5. Using a straight edge (S) Fig. 57, make certain the
surface of the Unifence table is level with the saw table
by adjusting the height of the two leveling screws (E)
Fig. 58 at the base of the table legs, and adjusting the
height of angle brackets (B) Fig. 53. Position hex nuts
(H) Fig. 58, against the bottom of the table legs to hold
the leveling screws in position and tighten.
IMPORTANT: Use a level, side to side and front to
back, to make sure the Unifence table is level with the
saw table.
Fig. 58
H
E
Fig. 57
S
Fig. 56
A
J
K
A
B
A