


40
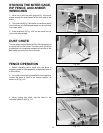
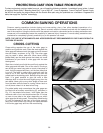
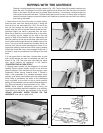
Ripping is cutting lengthwise through a board, (Fig. 125). The rip fence (A) is used to position and
guide the work. One edge of the work rides against the rip fence while the flat side of the board
rests on the table. Since the work is pushed along the fence, it must have a straight edge and
make solid contact with the table. The saw blade guard must be used. On Delta saws, the guard
has anti-kickback fingers to prevent kickback and a splitter to prevent the wood kerf from closing
and binding the blade.
RIPPING WITH THE UNIFENCE
1. Never stand in the line of the saw cut when ripping.
Hold the work with both hands and push it along the
fence and into the saw blade (Fig. 125). The work can
then be fed through the saw blade with one or two
hands. After the work is beyond the saw blade and anti-
kickback fingers, the hand is removed from the work.
When this is done the work will either stay on the table,
tilt up slightly and be caught by the end of the rear
guard, or slide off the table to the floor. Alternately, the
feed can continue to the end of the table, after which the
work is lifted and brought along the outside edge of the
fence. The cut-off stock remains on the table and is not
touched until the saw blade has stopped, unless it is a
large piece allowing safe removal. When ripping boards
longer than three feet, use a work support at the rear of
the saw to keep the workpiece from falling off the saw
table.
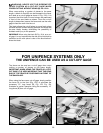
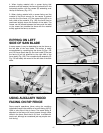
2. If the ripped work is less than 4 inches wide, a push
stick should always be used to complete the feed, as
shown in Fig. 126. The push stick can easily be made
from scrap material as explained in the section
“CONSTRUCTING A PUSH STICK.”
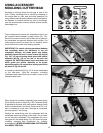
3. Ripping narrow pieces can be dangerous if not done
carefully. Narrow pieces usually cannot be cut with the
guard in position. If the workpiece is short enough, use a
pushboard. When ripping material under 2 inches in
width, a flat pushboard is a valuable accessory since
ordinary type sticks may interfere with the blade guard.
When using a pushboard, the width of the pushboard
must be added to the width of the rip fence position
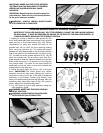
setting. A flat pushboard can be constructed as shown in
Fig. 126A and should be used as shown in Fig. 126B.
NOTE: Some special operations (when using the
moulding cutterhead) require the addition of an auxiliary
wood facing to the fence, as explained in the section
“USING AUXILIARY WOOD FACING ON THE
UNIFENCE” and use of a push stick.
Fig. 125
A
Fig. 126B
Fig. 126
Fig. 126A