RETEST AFTER REPAIR
Should a machine under test be rejected for any reason requiring the removal of any mechanical part that could
affect the machine’s electrical characteristics, or if any electrical components are repaired or replaced, the
machine must be retested.
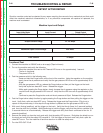
Machine Input and Output
Input Volts/Hertz Input Current Rated Output
230/1/60HZ 15 Amps 20A @ 100% Duty Cycle
Output Current Range 12 - 25 Amps
Maximum Open Circuit Voltage 400 Volts
Return to Section TOC Return to Section TOC Return to Section TOC Return to Section TOC
Return to Master TOC Return to Master TOC Return to Master TOC Return to Master TOC
TROUBLESHOOTING & REPAIR
F-48 F-48
PRO-CUT 25
Pilot Current 12 amps
Functional Test
1. Connect the machine to 230VAC and an air supply (70psi minimum).
2. Turn on the machine and verify the following:
- When the machine is turned on the Thermal LED turns on for approximately 1 second.
- The fan is functional.
- The power LED is lit.
3. Test the pressure switch in the following way:
-Press and hold the Purge button on the front of the machine. Using the regulator on the machine,
slowly lower the air pressure and verify that the gas pressure LED turns on at approximately 35 to
40 psi.
- With the gas pressure LED on, release the Purge button and then pull the trigger on the torch.
Verify that a pilot arc does NOT occur. Release the trigger.
- While again pressing the Purge button, slowly increase the air pressure using the regulator on the
machine until the gas pressure LED turns off. Verify that the LED turns off at approximately 40-45
psi.
- Continue to press the Purge button and set the air pressure at 65psi. Release the Purge button.
4. Test the Purge button safety function by again pressing the Purge button and then pulling the trigger on the
torch. Verify that a pilot arc does NOT occur. Release the trigger and the Purge button. (This is not a
repeat of the previous step, in this step the Purge button is pressed and the gas pressure LED is off.)
5. With no air flowing (postflow), pull the trigger on the torch. Verify that the air flows for 2 seconds (preflow)
and then the pilot arc is initiated. While continuing to hold the trigger, verify that the pilot arc remains lit for
3 seconds then turns off automatically. Release the trigger and verify that the air continues to flow for 10
seconds (postflow).
6. Remove the shield cup from the torch and verify that the safety LED turns on. Re-tighten the shield cup on
the torch and verify that the safety LED remains lit. Pull the trigger of the torch and verify that a pilot arc
does NOT occur. Turn the machine off and then back on to clear the safety error.
7. Turn the PRO-CUT 25 off.


