


MAINTENANCE
D-3 D-3
COMPACT WIRE WELDERS
GUN AND CABLE
MAINTENANCE
FOR MAGNUM™ 100L GUN
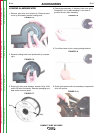
Gun Cable Cleaning
Clean cable liner after using approximately 300 lbs
(136 kg) of solid wire or 50 lbs (23 kg) of flux-cored
wire. Remove the cable from the wire feeder and lay it
out straight on the floor. Remove the contact tip from
the gun. Using low pressure air, gently blow out the
cable liner from the gas diffuser end.
Excessive pressure at the start may cause the dirt
to form a plug.
Flex the cable over its entire length and again blow out
the cable. Repeat this procedure until no further dirt
comes out.
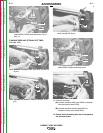
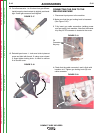
Contact Tips, Nozzles, and Gun Tubes
1. Dirt can accumulate in the contact tip hole and
restrict wire feeding. After each spool of wire is
used, remove the contact tip and clean it by push-
ing a short piece of wire through the tip repeatedly.
Use the wire as a reamer to remove dirt that may be
adhering to the wall of the hole through the tip.
2. Replace worn contact tips as required. A variable or
“hunting” arc is a typical symptom of a worn contact
tip. To install a new tip, choose the correct size con-
tact tip for the electrode being used (wire size is
stenciled on the side of the contact tip) and screw it
snugly into the gas diffuser.
3. Remove spatter from inside of gas nozzle and from
tip after each 10 minutes of arc time or as required.
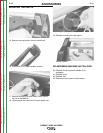
4. Be sure the gas nozzle is fully screwed onto the dif-
fuser for gas shielded processes. For the
Innershield
®
process, the gasless nozzle should
screw onto the diffuser.
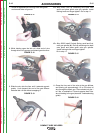
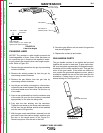
5. To remove gun tube from gun, remove gas nozzle
or gasless nozzle and remove diffuser from gun
tube. Remove both collars from each end of the
gun handle and separate the handle halves.
Loosen the locking nut holding the gun tube in
place against the gun end cable connector.
Unscrew gun tube from cable connector. To install
gun tube, screw the locking nut on the gun tube as
far as possible. Then screw the gun tube into the
cable connector until it bottoms. Then unscrew (no
more than one turn) the gun tube until its axis is
perpendicular to the flat sides of the cable connec-
tor and pointed in the direction of the trigger.
Tighten the locking nut so as to maintain the prop-
er relationship between the gun tube and the cable
connector. Replace the gun handle, trigger and dif-
fuser. Replace the gas nozzle or gasless nozzle.
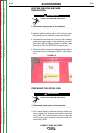
OVERLOAD PROTECTION
Output Overload
The Compact Wire Welders are equipped with a circuit
breaker and a thermostat which protects the machine
from damage if maximum output is exceeded. The cir-
cuit breaker button will extend out when tripped. The
circuit breaker must be manually reset.
Thermal Protection
The Compact Wire Welders have a rated output duty
cycle as defined in the Technical Specification pages.
If the duty cycle is exceeded, a thermal protector will
shut off the output until the machine cools to a rea-
sonable operating temperature. This is an automatic
function of the machine and does not require user
intervention. The fan continues to run during cooling.
Electronic Wire Drive Motor Protection
The Compact Wire Welders have built-in protection
against wire drive motor overload. If the motor current
limit is exceded the trigger circuit is interupted and the
weld stops.
CAUTION
Return to Section TOC Return to Section TOC Return to Section TOC Return to Section TOC
Return to Master TOC Return to Master TOC Return to Master TOC Return to Master TOC