


33
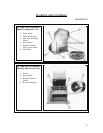
INSTALLATION
SECTION 3-6
With all power to the electrical control panel disconnected and locked out, reverse any two of the three
power line conductors to the machine. If there is more than one motor on the machine, and one is
turning in the wrong direction, and one isn't: reverse any two of the three line conductors at the overload
relay of the motor that you wish to reverse.
Unlock the power and switch it on at the electrical disconnect (if necessary, replace the fuses).
Re-check the rotation direction of the motor(s).
INTERLOCK SWITCH TEST PROCEDURE
With the machine stopped, perform the following steps.
TURN OFF and LOCK OUT THE POWER per OSHA 1910.147 OR ANSI Z244.1-1982 (Lockout/
Tag-out of Energy Sources).
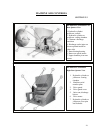
U se the wiring diagram appended to this manual to locate the interlock switch terminal strip in the jack-
screw control panel-
The wires for the upper chamber interlock switch are numbers 1 and 16.
The wires for the screen cradle interlock switch are numbers 16 and 5.
Connect an ohmmeter across each interlock switch terminal or across all interlock switch terminals (wire
numbers1 and 5).
Switch the ohmmeter resistance to the lowest scale.
When the interlock actuator screws are in place and properly activating their switches, the ohmmeter
should read zero resistance.
When either or both actuator bolts are withdrawn, the ohmmeter should read infinite resistance.
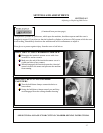
Loosen ONE actuator screw 3 to 4 turns.
If the meter reads INFINITY, before the screw can be completely removed, the INTERLOCK IS
WORKING.
If the meter reads ZERO RESISTANCE when the actuator screw is completely REMOVED the
interlock IS NOT working.
REPLACE THE FIRST ACTUATOR SCREW TESTED BEFORE TESTING THE SECOND ONE. If
an interlock does not work, the complete mechanism, including the switch, must be removed and
disassembled to determine the cause of the malfunction.
ALTERNATE TEST FOR THE INTERLOCK SWITCHES
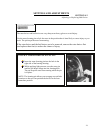
With the cutting chamber and screen cradle closed and power on, perforn1 the following steps.
Push the start button to start the granulator.
Retract the screen cradle interlock actuator screw by turning it counterclockwise. Make sure that the end
of the actuator screw is visible and clear of any contact. The granulator should stop.
If the machine continues to run, TURN OFF AND LOCK OUT THE POWER per OSHA 1910.147 OR
ANSI Z244.1-1982 (Lockout/Tag-out of Energy Sources).
Have the electrician check the interlock switch on the screen cradle to correct the malfunction.