


Removing and Installing a PRP
20
Performance Route Processor Installation and Configuration Guide
OL-11656-01
Required Tools and Equipment
You need the following tools and parts to remove and install a PRP:
• Flat-blade or Phillips screwdriver
• ESD-preventive wrist strap and instructions
• Antistatic mat, foam pad, or bag for the removed PRP. Place the removed PRP
into an antistatic bag if you plan to return it to the factory, or on an antistatic
mat or foam if you are replacing components and will reinstall the PRP.
Working with Electrical Equipment
Follow these basic guidelines when working with any electrical equipment:
• Before beginning any procedure requiring access to the chassis interior,
locate the emergency power-off switch for the room in which you are
working.
• Disconnect all power and external cables before moving a chassis.
• Do not work alone when potentially hazardous conditions exist; never assume
that power has been disconnected from a circuit; always check.
• Do not perform any action that creates a potential hazard to people or makes
the equipment unsafe.
• Carefully examine your work area for possible hazards such as moist floors,
ungrounded power extension cables, and missing safety grounds.
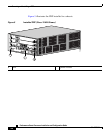
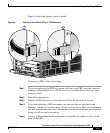
Removing and Installing a PRP
The following sections describe the procedures for removing and installing a PRP
as well as removing and installing other field-replaceable hardware on the PRP-2
board. Before beginning the procedures, verify that your system meets the
minimum requirements as described in the “Preparing for Installation” section on
page 18.
• Removing a PRP, page 21
• Installing a PRP, page 24