


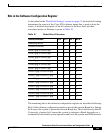

67
Performance Route Processor Installation and Configuration Guide
OL-11656-01
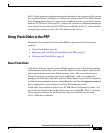
Additional Configuration and Maintenance Tasks
To install a CF into the PRP-2 board, follow these steps:
Step 1 Loosen the screw fastening the retaining bracket for the CF.
Step 2 Lift the end of the retaining bracket out of the hole that holds it in place flush with
the CF socket, and swivel it around until it is not in the way of installing the CF.
Step 3 Guide the CF into the socket with the side with the connectors going into the
socket.
Step 4 Push the CF until it snaps into place in the socket.
Step 5 Swivel the retaining bracket back into place with the end of the bracket resting in
the hole on the PRP-2 board.
Step 6 Fasten the screw on the retaining bracket.
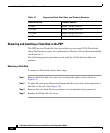
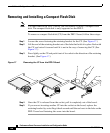
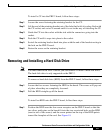
Removing and Installing a Hard Disk Drive
Note You must remove the PRP-2 before you can remove or install a hard disk drive.
The hard disk drive is only supported on the PRP-2.
To remove a hard disk drive (HDD) from the PRP-2 board, follow these steps:
Step 1 Loosen the four screws fastening the HDD to the board. The screws will pop out
of place when they are completely loosened.
Step 2 Pull the HDD straight up off the board.
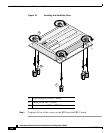
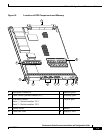
To install an HDD onto the PRP-2 board, follow these steps:
Step 1 Position the HDD over the four screw receptors on the PRP-2 board so that the
two silver guide pins on the board fit into the two associated holes on the HDD
(next to two of the screws) and the arrow printed on the top of the HDD points
toward the faceplate of the card. See Figure 18.