


Additional Configuration and Maintenance Tasks
64
Performance Route Processor Installation and Configuration Guide
OL-11656-01
Installing a Flash Disk
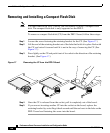
To install a Flash disk, follow these steps:
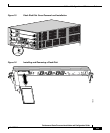
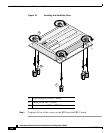
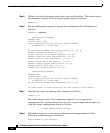
Step 1 Remove the Flash disk slot cover by loosening the captive screw shown in
Figure 15.
Step 2 Facing the PRP front panel, hold the Flash disk with the connector end of the card
toward the slot and the label facing to your right. (See Figure 16.)
Note The Flash disk is keyed and cannot be seated the wrong way. The ejector
button will not pop out if the card is not properly inserted.
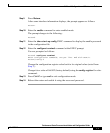
Step 3 Insert the card into the appropriate slot until the card completely seats in the
connector at the back of the slot and the ejector button pops out toward you.
Step 4 Replace the Flash disk slot cover.
Caution The Flash disk does not insert all the way inside the PRP; a portion of the card
remains outside of the slot. Do not attempt to force the card past this point.
Working with Flash Disks
A Flash disk contains the Cisco IOS software image you need to boot your router.
In some cases, you might need to insert a new Flash disk and copy images or
backup configuration files onto it. Before you can use a new Flash disk, you must
format it.
When using Cisco IOS commands, there is one major difference between using
Flash disks and linear Flash memory cards: When using a linear Flash memory
card, the Cisco IOS command to identify and access the card is slot0: or slot1:,
depending on the card slot in use. When using a Flash disk, those commands are
replaced with disk0: or disk1:. Other specific Flash disk information is found in
the remainder of this section.