


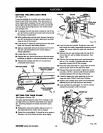
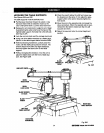
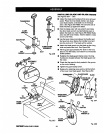
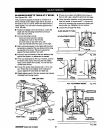

THUMBSCREW
CLAMP
BRACKET
SQUARENUT
CLAMPSHOWN
i ASSEMBLED
CUP
WASHER-------.-_
SLOT
Fig. 25B
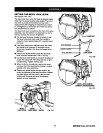
HOLE
TABLE
SUPPORT
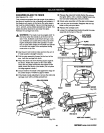
CUP
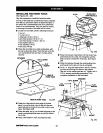
TO
LOOSEN
TO
TIGHTEN
SCREW
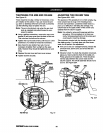
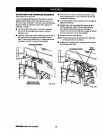
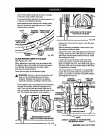
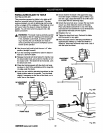
INSTALLING BLADE AND BLADE GUARD
See Figures 26,4 - 26C.
• Collect the blade and hardware that were removed
earlier. Place the inner blade washer, saw blade,
outer blade washer, and blade nut on the blade
arbor. See Figure 26,4. Note: The concave side of
blade washers go against the blade.
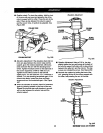
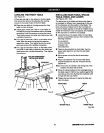
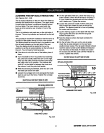
• Hold the blade arbor with one wrench and rotate
the other blade wrench counterclockwise (up), to
tighten the blade nut. See Figure 26B. Note: Blade
arbor has left hand threads. Test the blade to make
sure it turns freely.
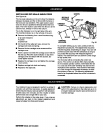
• Use the bevel index knob (above the handle) and
the bevel lock lever (below the handle) to set and
lock the motor at 0". The blade will be vertical.
• Attach the blade guard over the blade so the riving
knife and pawls face front. See Figure 26,4.
• Tilt the guard approximately 45" down in the front,
place it over the blade, and rotate itto a horizontal
locked position.
• Retighten the blade guard clamp screw, the long
thumbscrew located between the blade guard and
the motor.
• Check that the guard is firmly seated in the groove
on the motor housing.
• Tighten the guard clamp screw.
• Replace the retaining screw and nut at the bottom
of the lower inner blade guard. See Figure 26C.
THUMBSCREW BLADEGUARD BLADE
RETAINING
BCREWAND NUT
RIVINGKNIFE
ANDPAWLS
TO
BLADE
ROTATION
BLADENUT
INNERBLADE
WASHER
Fig. 26A
TO
;HTEN
BLADE
WRENCH(2)
[RAR3MIIIrRADIALSAW315.220381
BLADE
Fig. 25C
34
Fig. 26B