


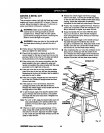

• Putthe blade in the in-rippositionbetween the
motorand the column. Release the yoke lock
handle and pivotthe yoke tothe left,with the yoke
pivotlatchon the rightside ofthe arm. (Use the
out-rip position only for rips 12 in. or more in
width; pivot the yoke to the right so the motor
is between the blade and column.)
• Loosenthe carriage lock knob. Place the bladethe
rightdistancefrom the fence for the cutand lock
the knob.
• Cut a kerr. Turn the saw on withthe switchon the
arm. Lowerthe blade about 1/16 in. into thetable to
cut a shallow groove. Turn the saw off and remove
the yellow key.
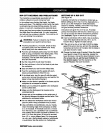
• Position the workpiece against the blade, from the
front of the table. Lower the hold-down in front of
the blade tojust clear the workpiece. (For a bevel
rip cut, place the workpiece directly under the
guard rather than beside the blade.)
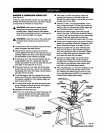
• Loosen the pawls and rivingknife. Lowerthe riving
knife tothe table. Slidethe workpiece back and
lower the pawlssothat one set restson the work-
piece. Lockthe rivingknife and pawls inplace. (For
a bevel rip cut, place the workpiece under the
lower set of pawls.)
• Remove the workpiecefrom the table. Set the push
block,featherboard, or pushsticknearby.
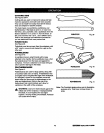
• Set up table extension(s)and supports.
WARNING: Never use a person to support
m
workpieces.This can cause kickback and
serious injury.Never have someone stand at the
ouffeed side.
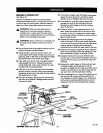
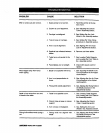
MAKING A RIP CUT
See Figure 47.
• Review the Hazards and Precautions page.
• Do not make a dp cut without following all the setup
steps in the previous procedure.
• After the saw has been set up, insert the yellow
key, and turn the saw on with the switchon the
arm. Let the blade build up to full speed.
• Stand at the infeed side of the blade and out of the
line of the workpiece, in case kickback occurs.
_. WARNING: Never stand directly in the line of
cut. Stand to the side to reduce the chance of
injury shouldkickback occur. Start and finish the
cut from the infeed side.
• With the hand closestto the fence, push the
workpiece under the hold down and into the blade.
Keep your otherhand onthe table and steadythe
workpieceagainstthe fence. Keep that handat
least8 in.from the blade.
Ifthe blade cover does notautomaticallyriseas
the workpiecemoves from the infeed tothe out-
feed side,stop the cut. Turn off the saw and adjust
the blade cover so itrests on the workpiece.
When the end of the workpiece isstillseveral
inchesfrom the blade, pick up the cuttingaid you
selected earlier. Push the woodwith the pushstick
or pushblockratherthan your hand.
,_ WARNING: Use a pushstickas the end ofthe
workpiece nears the blade to reduce the risk of
injury.
• Pushthe woodcompletelythroughthe blade to the
outfeed,past the pawls.
• When thework iscompleted,pressthe switchoff
and remove the key.
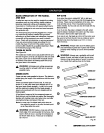
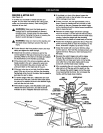
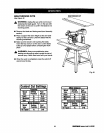
SWITCH
ANTI-KICKBACK
INFEEDFOR
OUT RIPCUTTING BLADE
Fig. 47
51 rllAFrSMlUr RADIALSAW315,220381