


OPERATION
B-5 B-5
V160-S & -T
Return to Section TOC Return to Section TOC Return to Section TOC Return to Section TOC
Return to Master TOC Return to Master TOC Return to Master TOC Return to Master TOC
DIP SWITCH FUNCTIONS
T
his section has 8 DIP switch functions of the V160-S.
Read and understand the functions before making any
changes because abnormal operation can occur with
the wrong settings. The machine must be turned OFF
when the DIP Switches are changed.
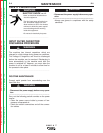
ELECTRIC SHOCK CAN KILL:
Be sure that all installation, operation,
maintenance and repair procedures
are performed only by qualified indi-
viduals. Lincoln Electric is not
responsible for damages caused by
improper installation, improper care or abnormal
operation.
Before opening the machine to make changes to
the DIP Switches it must first be turned OFF and
disconnected from the input source. Do not open
the machine or change the DIP Switches with
power applied to the machine. Only Lincoln
trained service technicians are authorized to per-
form these modifications.
------------------------------------------------------------------------
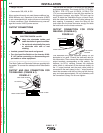
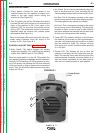
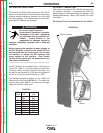
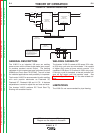
The DIP switches are numbered from 1 to 8 shown in
Figure B.3. Switch 1 is on the bottom and switch 8 is
on the top. When a switch is pushed to the right (or to
the back of the machine) it is ON; when it is pushed to
the left (or to the front of the machine) it is OFF.
The standard production settings for the V160-S are
shown with in bold letters ON Table B.1. If a switch set-
ting has bold letters ON, do not make any changes;
abnormal operation could occur.
DIP Switch 1: Machine Type
This controls the output of the V160-S and some weld-
ing waveform functions. It configures the V160-S to
automatically turn ON depending on the position of the
Welding Mode switch. Refer to DIP Switch 6 for more
information.
DIP Switch 2 thru 5 non-functional for the V160-S.
FIGURE B.3
WARNING
DIP
Switch 1
DIP
Switch 8
Front of machine
DIP V160-S V160-S
Switch CE USA
1 ON ON
2 OFF OFF
3 OFF ON
4 ON OFF
5 OFF OFF
6 OFF ON
7 OFF OFF
8 OFF OFF
TABLE B.1