


15
3. GETTING STARTED
3.1. Unpacking and Initial Setup
CAUTION
To avoid personal injury, always use two persons to lift and carry the Model T100H.
1. Inspect the received packages for external shipping damage. If damaged, please advise the shipper first,
then TAPI.
2. Included with your analyzer is a printed record (Form number 04989) of the final performance
characterization performed on your instrument at the factory. This record is an important quality assurance
and calibration record for this instrument. It should be placed in the quality records file for this instrument.
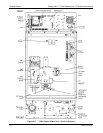
3. Carefully remove the top cover of the analyzer and check for internal shipping damage.
Remove the set screw located in the top, center of the rear panel
Remove the screws fastening the top cover to the unit (four per side).
Lift the cover straight up.
4. Inspect the interior of the instrument to make sure all circuit boards and other components are in good
shape and properly seated.
5. Check the connectors of the various internal wiring harnesses and pneumatic hoses to make sure they are
firmly and properly seated.
6. Verify that all of the optional hardware ordered with the unit has been installed. These are checked on the
paperwork (Form 04989) accompanying the analyzer.
WARNING
Ensure that the power source voltage and frequency match those of the instrument
specs on the rear panel model label. Never disconnect electronic circuit boards, wiring
harnesses or electronic subassemblies while the unit is under power.
CAUTION – Avoid Warranty Invalidation
Printed circuit assemblies (PCAs) are sensitive to electro-static discharges too small to
be felt by the human nervous system. Damage resulting from failure to use ESD
protection when working with electronic assemblies will void the instrument warranty.
See A Primer on Electro-Static Discharge in the main manual for more information on
preventing ESD damage.
07265A DCN6038