


21
After the system is leak-free and evacuation has
been completed, it is ready for charging. Before
actual charging, however, the entire operation
of the refrigeration system should be inspected
as outlined below:
A. Low Side Equipment
1. Fans on air handling equipment running.
2. Pumps on water cooling equipment run-
ning.
3. Proper location and attachment of thermo-
static expansion valve bulb to suction line.
4. Correct fan and pump rotation.
5. Evaporator pressure regulators and solenoid
valves open.
6. Water pumps and motors correctly aligned.
7. Belt drives correctly aligned and tensioned.
8. Proper voltage to motors.
B. Compressors
1. Proper oil level.
2. Voltage agrees with motor characteristics.
3. Properly sized motor fuses and heaters.
4. Direct drivers aligned and couplings tight.
5. All suction and discharge valves open.
6. All transducers and RTD’s calibrated and
reading correctly.
C. Condensers
1. Water available at water cooled condensers
and supply line valve open.
2. Water in receiver of evaporative condenser
and makeup water available.
3. Correct rotation of pump and fan motors.
4. Belt drives aligned and tensioned correctly.
5. Pump, fans and motors lubricated.
D. Controls
Controls should be at the initial set points. See
microprocessor manual for further information.
E. Initial Charging – High Side Charging
There are two methods of charging refriger-
ant into the system, through the “high side” or
through the “low side”. High side charging is
usually used for initial charging as lling of the
system is much faster. Low side charging is
usually reserved for adding only small amounts
of refrigerant after the system is in operation.
High side charging of refrigerant into the system
is accomplished as follows:
1. Connect a full drum of refrigerant to the
liquid charging valve. This valve is gener-
ally located in the liquid line immediately
after the king or liquid line valve. Purge the
air from the charging line.
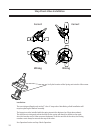
2. Invert the refrigerant drum if the drum is
not equipped with “Liquid” and “Vapor”
valves, and place in such a position so the
liquid refrigerant only can enter the sys-
tem. Close the liquid line or king valve, if
it is not already closed. Open the “Liquid”
charging valve slowly to allow refrigerant
to enter the system. The vacuum in the
system will draw in the refrigerant.
It is important that, during this operation,
air handling units be running and water is
circulating through the chillers. The low
pressures on the system can cause the
refrigerant to boil at low temperature and
possibly freeze the water if it is not kept
circulating.
Water freezing in a chiller can rupture the
tubes and cause extensive damage to the
system. It would be desirable to charge
the initial amount of refrigerant without
water in the shell and tube equipment to
eliminate the possibility of freeze up.
3. After some refrigerant has entered the
system, the compressor unit starting pro-
cedure may be followed. See Start-Up and
Operation Section of this manual.
4. Continue charging refrigerant into the
system until the proper operating require-
ments are satised. Then, close the liquid
charging connection and open the liquid
line valve allowing the system to operate
normally. To check that enough refriger-
ant has been added, the liquid sight glass
Installation