


Return to Section TOC Return to Section TOC Return to Section TOC Return to Section TOC
Return to Master TOC Return to Master TOC Return to Master TOC Return to Master TOC
LN-7 GMA WIRE FEEDER
TROUBLESHOOTING AND REPAIRF-36
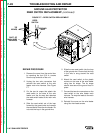
CONTROL RELAY REPLACEMENT
(continued)
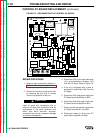
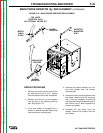
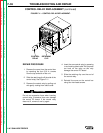
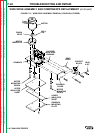
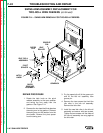
FIGURE F.11 – CONTROL RELAY REPLACEMENT.
CONTROL
RELAY
RETAINING
CLIP
REPAIR PROCEDURE
1. Remove the cover from the control box
by removing the four 5/16 in. screws
from the top and side of the unit.
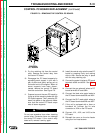
2. Slide the retaining clip off the side of the
control relay. See Figure F.11.
3. Remove the control relay by pulling out
wile gently rocking from side to side.
Do not use excessive force when inserting
control relay. Excessive force can damage
the control PC board. If the control relay
does not fit, remove it and try again.
4. Insert the new control relay by pressing
in and rocking side to side. Do not press
too hard on the relay as this may
damage the control PC board.
5. Slide the retaining clip over the end of
the control relay.
6. Reinstall the cover on the control box
using four hex head screws.
CAUTION