


Vertical Drilling Motor, Type GE752, GEK–91584D
19
WARNING: When using compressed air for
cleaning purposes, flying debris and particles
may present a hazard to personnel in the im-
mediate area. Personnel should be provided
with, and trained in the use of, personal pro-
tective equipment as specified by applicable
federal or state safety regulations.
Air Curing Commutator
After the commutator has been sanded, stoned or
ground and blown clean, it should be air cured as fol-
lows:
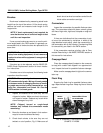
1. Rotate the armature slowly with the same source
of power used for sanding, stoning or grinding.
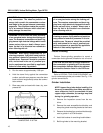
2. Use a rubber air–hose with the nozzle removed
and sweep the commutator surface with 70 psi
air pressure.
WARNING: Observe all the following safety
precautions to avoid injury.
1. Remove all metal fittings from the air hose
or, if impossible to remove, insulate the
fitting.
2. Be certain an operator is stationed at the
power–supply control to quickly remove
power from the machine should an emer-
gency arise.
3. Wear rubber–insulated gloves and
goggles while air curing. Stand on an in-
sulated platform.
4. Avoid contact with the cable terminals.
WARNING: Do not come into close proximity
of an energized motor during the cleaning pro-
cess. The armature commutator and brush rig-
ging have a high electrical charge which could
cause serious injury or death. Always use a
hose tip that is an electrical non–conductor
when cleaning with air.
3. Increase the machine speed to approximately
900 rpm and blow air on the commutator until the
sparking stops.
4. Increase the speed until full speed is reached (do
not exceed 1000 rpm) and continue to blow air on
the commutator until all sparking stops.
5. Stop the machine.
6. Disconnect external power supply to machine.
Make all necessary mechanical and electrical
changes to restore the machine to service.
7. Use a clean cloth and wipe off the brushholders,
creepage band and accessible surfaces in the
commutator chamber.
8. Brushholder Clearance – Install the brushholder
previously removed and check and adjust as re-
quired the brushholder–to–commutator clear-
ance on all brushholders. See previous Brush-
holder Replacement and Brushholder Clearance
Adjustment sections for instructions to install the
brushholder, and to adjust brushholder clear-
ance.
9. Installing Brushes – Refer to BASIC REPAIRS,
Brush Replacement section, and install
serviceable or new brushes per instructions
listed.
10. Vacuum interior of commutator chamber.
BASIC OVERHAUL
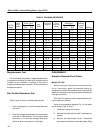
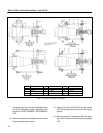
NOTE: Be sure to use the correct drawings for
the machine being overhauled. Refer to Table 2
on page 20 to determine the correct drawing.
It is recommended that a basic overhaul be per-
formed every two years, or 18,000 hours. The time inter-
val between overhauls may vary, depending on the con-
dition of the machine and the severity of service.
The following basic overhaul procedures include in-
structions to disassemble, clean, inspect, repair, reas-
semble and test the machine.
TESTING BEFORE DISASSEMBLY
Perform the following tests prior to disassembly of
the machine: