


ENGINE RPM ADJUSTMENT TEST PROCEDURE (continued)
PROCEDURE
1. Turn the engine off.
2. Place the RPM adjustment potentiometer or
"Custom Arc" control to maximum (Classic®
300G and Classic® 300D Kubota models only.)
3. Open the side door.
NOTE: Secure the door in the open position using
the door restraint system. If the machine
does not have a door restraint system,
remove the door or securely restrain it to
prevent it from falling closed.
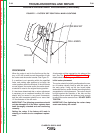
Classic® 300D Perkins only:
Check that the linkage attaching the solenoid to the
engine speed control lever is properly aligned and
in good condition.
Strobe-Tach Method:
Place a highly visible mark on the engine crank-
shaft pulley, or another rotating component con-
nected to the engine crankshaft.
Connect the strobe-tach according to the manufac-
turer's instructions.
Start the engine and place the idle switch in the
"HIGH IDLE" position. Make sure that there is no
load on the machine and allow the engine RPM to
stabilize.
Direct the strobe-tach light on the highly visible
mark that had been applied earlier and synchro-
nize the light with the rotating mark. See the
strobe-tach manufacturer's instructions.
The tach should read between 1790 and 1810
RPM
Move the idle switch to the "AUTO IDLE" position
and wait for the engine RPM to drop and stabilize
at the low idle RPM.
Synchronize the strobe-tach to read the low idle
RPM.
The tach should read as follows:
• 1325 to 1475 for Classic® 300G and Classic®
300Ds powered by the Perkins 104.22 engines.
• 1350 to 1450 for Classic® 300Ds powered by
other Perkins engines
• 1390 to 1410 for Classic® 300D Kubota models.
If either of the readings is incorrect, proceed to the
"ENGINE RPM ADJUSTMENT PROCEDURE"
later in this section.
Frequency counter method:
NOTE: A dedicated frequency counter can be used
for this test, but many high quality digital
multimeters also have this function, and
can be easily utilized. See the manufactur-
er's instructions for your frequency counter
or multimeter.
Set your frequency counter per the meter manu-
facturer's instructions, and plug the probes into one
of the 120VAC auxiliary receptacles.
Start the engine and place the idle switch in the
"HIGH IDLE" position. Make sure that there is no
load on the machine and allow the engine RPM to
stabilize.
The frequency should read between 59.7 and 60.3
Hz.
Move the idle switch to the "AUTO IDLE" position
and wait for the engine RPM to drop and stabilize
at the low idle RPM.
The frequency counter should read as follows:
• 44.2 to 49.2 Hz. for Classic® 300G and Classic®
300Ds powered by the Perkins 104.22 engines.
• 45 to 48.3 Hz. for Classic® 300Ds powered by
other Perkins engines
• 46.3 to 47 Hz. for Classic® 300D Kubota models.
If either of the readings is incorrect, proceed to the
"ENGINE RPM ADJUSTMENT PROCEDURE"
later in this section.
NOTE: For Lincoln Electric 1800 RPM (4 Pole)
machines, that have 60 Hz AC auxiliary
power; the engine RPM can be determined
by multiplying the frequency of the auxiliary
power output, in Hz. By 30. (Example: 60
Hz. * 30 = 1800 RPM)
TROUBLESHOOTING AND REPAIR
F-32 F-32
CLASSIC® 300D & 300G
Return to Section TOC Return to Section TOC Return to Section TOC Return to Section TOC
Return to Master TOC Return to Master TOC Return to Master TOC Return to Master TOC