Installation
Installing the iSR6250 Router
3-10 SN0051103-00 A
S
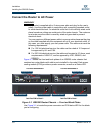
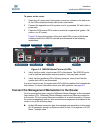
Direct Ethernet connection from the management workstation to the router
RJ-45 Ethernet connector. This requires a 10/100 Base-T crossover cable.
Serial port connection from the management workstation to the router
RS-232 serial port connector. This requires a 10/100 Base-T straight cable
and a dongle.
Configure the Management Workstation
The router comes from the factory with a default IP address (10.0.0.1). Prior to
product installation, follow the procedures based on your configuration method:
If you plan to configure the router through the management Ethernet port
(using the SANsurfer Router Manager or CLI via telnet), you must initially
configure the workstation as described in “Setting the Workstation IP
Address” on page 3-10.
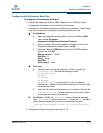
If you plan to configure the router using the management COM port,
configure the workstation as described in “Configuring the Workstation
Serial Port” on page 3-11.
Setting the Workstation IP Address
The IP address of a new router is 10.0.0.1. To ensure that your workstation is
configured to communicate with the 10.0.0 subnet, refer to the following
instructions for your workstation:
Steps for different versions of Windows vary. For a Windows 2000
workstation, do the following:
a. From the Windows Start menu, select Settings>Control
Panel>Network and Dial-up Connections.
b. Click Make New Connection.
c. Click Connect to a private network through the Internet, then click
Next.
d. Enter 10.0.0.253 for the IP address.
For different versions of Windows, consult the Windows Help files.
For Linux or Solaris workstation, open a command window and enter the
following command, where <interface> is your interface name:
ifconfig <interface> ipaddress 10.0.0.253 netmask
255.255.255.0 up


