


3 – 2
VSG/VSSG • Installation, Operation and Maintenance Manual •Vilter/Emerson • 35391SSG
COMPRESSOR MOTOR
The following are general recommendations. Refer to
specifi c motor manufacturer instructions for storage
recommendations.
• Remove the condensation drain plugs from those
units equipped with them and insert silica-gel into
the openings. Insert one-half pound bags of silica-
gel (or other desiccant material) into the air inlets and
outlets of drip-proof type motors.
NOTE
Bags must remain visible and tagged, so they will be
noticed and removed when the unit is prepared for
service.
• Cover the motor completely to exclude dirt, dust,
moisture, and other foreign materials.
• If the motor can be moved, it is suggested that the
entire motor be encased in a strong, transparent plas-
tic bag. Before sealing this bag, a moisture indicator
should be attached to the side of the motor and sev-
eral bags of silica-gel desiccant be placed inside the
bag around the motor. When the moisture indicator
shows that the desiccant has lost its effectiveness, re-
place desiccants.
• Whenever the motor cannot be sealed, space heat-
ers must be installed to keep the motor at least 10°F
above the ambient temperature.
• Rotate motor and compressor shafts several revolu-
tions (approximately 6) per month to eliminate fl at
spots on the bearing surfaces. For motors utilizing
anti-friction bearings, the shaft should be rotated
once every 30 days by hand at 30 RPM for 15 seconds
in each direction. Bearings should also be re-lubricat-
ed at 2-year intervals using the grease specifi ed on
the motor lubrication nameplate.
• If the compressor unit is installed, wired and charged
with oil, open all oil line valves and run the oil pump
for 10 seconds prior to rotating the compressor shaft.
Continue running the oil pump while the compressor
shaft is being turned to help lubricate the surfaces of
the shaft seal.
For additional storage information, refer to Appendices.
Long Term Storage Recommendations
The procedure described is a general recommendation
for long term storage (over one month of no operation)
of Vilter compressor units. It is the responsibility of the
installation fi rm and end user to address any unusual
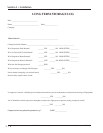
conditions. Use the supplied long term storage log sheet
to help with record keeping, see section page 3-3.
Warranty of the system remains in effect as described at
the beginning of this manual, section page i.
The following are recommendations regarding long
term storage:
• If the unit is designed for indoor duty, it must be
stored in a heated building.
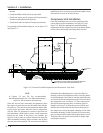
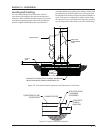
• If the unit is designed for outdoor duty and is to be
stored outdoors, a canvas tarp is recommended
for protection until installation. Adequate drainage
should be provided. Place wood blocks under the
base skid so that water does not collect inside the
base perimeter or low spots in the tarp.
• All compressor stop valves are to be closed to isolate
the compressor from the remainder of the system.
All other valves, except those venting to atmosphere,
are to be open. The unit is shipped with dry nitrogen
holding charge of approximately 5 psi above atmo-
spheric pressure. It is essential that the nitrogen hold-
ing charge be maintained.
• The nitrogen or clean dry gas holding charge in the
system and compressor are to be monitored on a
regular basis for leakage. If not already installed, it is
required that a gauge is to be added to help moni-
tor the nitrogen holding charge pressure. If a drop in
pressure occurs, the source of leakage must be found
and corrected. The system must be evacuated and
recharged with dry nitrogen to maintain the package
integrity.
• Cover all bare metal surfaces (coupling, fl ange faces,
etc.) with rust inhibitor.
• Desiccant is to be placed in the control panel. If the
panel is equipped with a space heater, it is to be ener-
gized. Use an approved electrical spray-on corrosion
inhibitor for panel components (relays, switches,
etc.)
• All pneumatic controllers and valves (Fisher, Taylor,
etc.) are to be covered with plastic bags and sealed
with desiccant bags inside.
Section 3 • Installation