


Return to Section TOC Return to Section TOC Return to Section TOC Return to Section TOC
Return to Master TOC Return to Master TOC Return to Master TOC Return to Master TOC
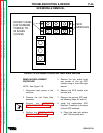
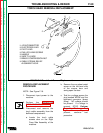
9. Pull the rubber air line hose into
the machine out of the rubber
grommet. Be sure to keep the
Case Back Assembly support-
ed. Allow it to lean out away
from the machine at about a 45
0
angle so you have plenty of
room to work on the fan blade
and fan motor.
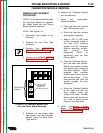
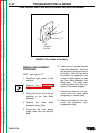
10. Remove the fan blade. Note
fanblade position on motor shaft
for reference when replacing
fan.
a. Loosen the fan blade clamp
using a slot head screw-
driver or 5/16” nut driver. Do
not completely unscrew the
clamp.
b. Slide the fan blade and
clamp off the motor shaft.
NOTE: See Step 13 when
reinstalling the fan.
11. Remove the fan motor.
a. Loosen and remove the two
nuts, flat washers, and lock
washers from the motor
mounting bracket using an
11/32” open end wrench.
When the motor is free
from the mounting bracket,
place it carefully on the
bottom of the machine.
b. Remove the Case Back
Assembly.
c. Cut the wire wraps bundling
the motor leads.
d. Cut the motor leads or
remove the wire connectors
to remove the motor.
12.Install replacement motor in
reverse order of removal.
13.Install fan blade. When
installing the fan blade, be sure
the clamp is placed on the
motor side of the shaft.
a. Slide the fan .25” past the
end of the shaft and tighten
the clamp.
b. Spin the fan to be sure it is
free to rotate.
14.Reassemble the remaining
components in reverse order of
removal.
FAN BLADE AND FAN MOTOR REMOVAL/REPLACEMENT
TROUBLESHOOTING & REPAIR
PRO-CUT 60
F-48