


22-19
Cisco IOS Software Configuration Guide for Cisco Aironet Access Points
OL-11350-01
Chapter 22 Wireless Device Troubleshooting
Reloading the Access Point Image
Follow these steps to reload the access point image file:
Step 1 The PC you intend to use must be configured with a static IP address in the range of 10.0.0.2 to 10.0.0.30.
Step 2 Make sure that the PC contains the access point image file (such as c1100-k9w7-tar.123-8.JA.tar for an
1100 series access point or c1200-k9w7-tar.123-8.JA.tar for a 1200 series access point) in the TFTP
server folder and that the TFTP server is activated. For additional information, refer to the “Obtaining
the Access Point Image File” and “Obtaining TFTP Server Software” sections.
Step 3 Rename the access point image file in the TFTP server folder. For example, if the image file is
c1100-k9w7-tar.123-8.JA.tar for an 1100 series access point, rename the file to c1100-k9w7-tar.default.
Step 4 Connect the PC to the access point using a Category 5 (CAT5) Ethernet cable.
Step 5 Disconnect power (the power jack for external power or the Ethernet cable for in-line power) from the
access point.
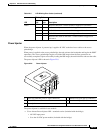
Step 6 Press and hold the MODE button while you reconnect power to the access point.
Step 7 Hold the MODE button until the status LED turns red (approximately 20 to 30 seconds), and release the
MODE button.
Step 8 Wait until the access point reboots as indicated by all LEDs turning green followed by the Status LED
blinking green.
Step 9 After the access point reboots, you must reconfigure the access point by using the Web-browser interface
or the CLI.
Using the Web Browser Interface
You can also use the Web browser interface to reload the wireless device image file. The Web browser
interface supports loading the image file using HTTP or TFTP interfaces.
Note Your wireless device configuration does not change when you use the browser to reload the
image file.
Browser HTTP Interface
The HTTP interface enables you to browse to the wireless device image file on your PC and download
the image to the wireless device. Follow the instructions below to use the HTTP interface:
Step 1 Open your Internet browser. You must use Microsoft Internet Explorer (version 5.x or later) or Netscape
Navigator (version 4.x).
Step 2 Enter the wireless device’s IP address in the browser address line and press Enter. An Enter Network
Password screen appears.
Step 3 Enter your username in the User Name field.
Step 4 Enter the wireless device password in the Password field and press Enter. The Summary Status page
appears.
Step 5 Click the System Software tab and then click Software Upgrade. The HTTP Upgrade screen appears.
Step 6 Click Browse to find the image file on your PC.