4-31
Cisco IOS Software Configuration Guide for Cisco Aironet Access Points
OL-11350-01
Chapter 4 Configuring the Access Point for the First Time
Configuring the 802.1X Supplicant
You can complete the phases in any order, but they must be completed before the supplicant becomes
operational.
Creating a Credentials Profile
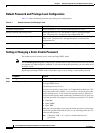
Beginning in privileged EXEC mode, follow these steps to create an 802.1X credentials profile:
Use the no form of the dot1x credentials command to negate a parameter.
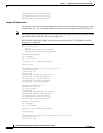
The following example creates a credentials profile named test with the username Cisco and a the
unencrypted password Cisco:
ap1240AG>enable
Password:xxxxxxx
ap1240AG#config terminal
Enter configuration commands, one per line. End with CTRL-Z.
ap1240AG(config)# dot1x credentials test
ap1240AG(config-dot1x-creden)#username Cisco
ap1240AG(config-dot1x-creden)#password Cisco
ap1240AG(config-dot1x-creden)#exit
ap1240AG(config)#
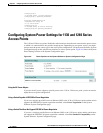
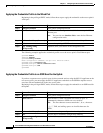
Applying the Credentials to an Interface or SSID
Credential profiles are applied to an interface or an SSID in the same way.
Command Purpose
Step 1
configure terminal Enter global configuration mode.
Step 2
dot1x credentials profile Creates a dot1x credentials profile and enters the dot1x
credentials configuration submode.
Step 3
anonymous-id description (Optional)—Enter the anonymous identity to be used.
Step 4
description description (Optional)—Enter a description for the credentials profile
Step 5
username username Enter the authentication user id.
Step 6
password {0 | 7 | LINE} Enter an unencrypted password for the credentials.
0—An unencrypted password will follow.
7—A hidden password will follow. Hidden passwords are used
when applying a previously saved configuration.
LINE—An unencrypted (clear text) password.
Note Unencrypted and clear text are the same. You can enter a
0 followed by the clear text password, or omit the 0 and
enter the clear text password.
Step 7
pki-trustpoint pki-trustpoint (Optional and only used for EAP-TLS)—Enter the default
pki-trustpoint.
Step 8
end Return to the privileged EXEC mode.
Step 9
copy running config
startup-config
(Optional) Save your entries in the configuration file.


