


Return to Section TOC Return to Section TOC Return to Section TOC Return to Section TOC
Return to Master TOC Return to Master TOC Return to Master TOC Return to Master TOC
OPERATION
B-5 B-5
PRO-CUT 80
CONTROLS AND SETTINGS
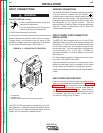
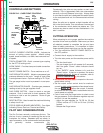
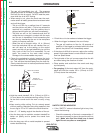
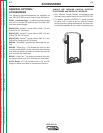
FIGURE B.2 - CASE FRONT CONTROLS
OUTPUT CURRENT CONTROL KNOB - Adjusts the
amount of cutting current applied. Affects cutting
speed, dross formation, cut width, heat zone and trav-
el speed.
TORCH CONNECTOR - Quick- connect type coupling
for the PCT 80 cutting torch.
WORK CABLE - Provides clamp and cable connection
to workpiece.
ON/OFF POWER SWITCH - Turns machine on or off.
GAS REGULATOR KNOB - Adjusts compressed gas
pressure delivered to the torch. Length of torch hose
is an adjustment factor. Optimum setting is 70-75 psi.
The gas purge button must be pressed in to set pres-
sure.
GAS REGULATOR GUAGE - Provides gas presssure
reading as set by the gas regulator knob.
GAS PURGE BUTTON - Used to check or set gas
pressure. Push in and hold to check pressure, then
continue to hold to set the pressure. Shuts off gas
when released.
RESET BUTTON - Used to reset the machine following
a safety circuit trip.
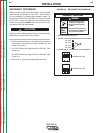
STATUS (DISPLAY) BOARD INDICATORS - Four lights
indicating Power, Gas Low, Thermal and Safety.
PILOT ARC CONSIDERATIONS
The Pro-Cut has a smooth, continuous pilot arc. The
pilot arc is only a means of transferring the arc to the
workpiece for cutting. Repeated pilot arc starts, in
rapid succession, is not recommended as these starts
will generally reduce consumable life.
Occasionally, the pilot arc may sputter or start inter-
mittently. This is aggravated when the consumables
are worn or the air pressure is too high. Always keep
in mind that the pilot arc is designed to transfer the arc
to the workpiece and not for numerous starts without
cutting.
When the pilot arc is started, a slight impulse will be
felt in the torch handle. This occurrence is normal and
is the mechanism which starts the plasma arc. This
impulse can also be used to help troubleshoot a "no
start" condition.
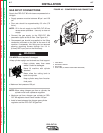
CUTTING OPERATION
When preparing to cut or gouge, position the machine
as close to the work as possible. Make sure you have
all materials needed to complete the job and have
taken all safety precautions. It is important to follow
these operating steps each time you use the machine.
• Turn the machine's ON/OFF POWER SWITCH to
the OFF position.
• Connect the air supply to the machine.
• Turn the main power and the machine power switch
on.
- The fan should start.
- The pre-charge circuit will operate for 3 seconds,
then the green "Power" status indicator should
turn on.
- If the "SAFETY" status indicator is lit, push the
"Reset" button. If there is no problem, the status
indicator will go off. If there is a problem, refer to
"STATUS INDICATOR" in this section.
• Be sure that the work lead is clamped to the work-
piece before cutting.
• Set the output current control knob for maximum
current for high cutting speed and less dross forma-
tion per Figure B.1. Reduce the current, if desired,
to reduce the kerf (cut) width, heat affected zone or
travel speed as required.
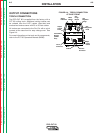
• Push-in and hold the Purge button to check or set
the gas pressure. Pull the pressure regulator cap out
and turn it to set the pressure.
- Adjust the gas regulator for 70 PSI for 25 foot
(7.62m) torches or 75 PSI for 50 foot (15.24m)
torches.
- Release the Purge button.
XXXXXXXX XXXXXXXX XXXXXXXX XXXXXXXX
PRO-CUT 80
Torch
Connector
Work
Cable
Input
Power
Switch
Output
Control
Knob
Consumable
Storage
(behind
door)
Status
Indicators
Reset
Button
Gas
Purge
Button
Gas
Regulator
Gauge
Gas
Regulator
Knob
Interface
Connector