


- The gas will immediately turn off. The pressure
gauge may show an increase in pressure after the air
turns off, but this is normal. Do NOT reset the pres-
sure while the air is NOT flowing.
• When ready to cut, place the torch near the work,
make certain all safety precautions have been taken
and pull the trigger.
- The air will flow for a preflow time of 2 seconds
and the pilot arc will start. (This is true unless the
machine is in postflow, then the preflow time is
skipped and the pilot arc will start immediately.)
- The pilot arc will run for 3 seconds and shut off
unless the arc is brought in contact with the work
and the arc is transferred. Avoid excessive pilot
arc time by transferring the arc to the workpiece
quickly to improve parts life.
- When the arc is brought within 1/4 in. (6.4mm)
from the workpiece the arc will transfer, the cur-
rent will ramp up to the setting on the control
panel, and the cut can last indefinitely (or until the
duty cycle of the Pro-Cut is exceeded). Do not
touch the nozzle to the work when cutting.
Damage to the consumables may result.
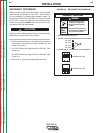
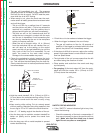
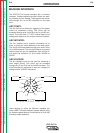
• Pierce the workpiece by slowly lowering the torch
onto the metal at a 30° angle away from the opera-
tor. This will blow the dross away from the torch tip.
Slowly rotate the torch to vertical position as the arc
becomes deeper.
• Hold the nozzle standoff 1/8 in. (3.2mm) to 3/16 in.
(4.7mm) above the workpiece during cutting. Do not
let the torch nozzle touch the work or carry a long
arc.
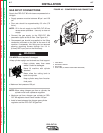
• Keep moving while cutting. Cut at a steady speed
without pausing. Maintain the cutting speed so that
the arc lag is 10° to 20° behind the travel direction.
•
Use a 5° - 15° leading angle in the direction of the cut.
• Use the drag cup to maintain constant standoff for
better cut quality and to protect the nozzle from
spatter.
• Use the drag cup with a metal template to prevent
nozzle double arcing.
• Finish the cut to be made and release the trigger.
• When the trigger is released, the arc will stop.
- The gas will continue to flow for 10 seconds of
postflow. If the trigger is activated within this time
period, the pilot arc will immediately restart.
• If the dross is difficult to remove, reduce the cutting
speed. High speed dross is more difficult to remove
than low speed dross.
• The right side of the cut is more square than the left
as viewed along the direction of travel.
• Clean spatter and scale from the nozzle and drag
cup frequently.
• For gouging, tilt the torch about 45° from the work-
piece and hold the nozzle 1/8 in. (3.2mm) to 3/16”
(4.7mm) above the workpiece.
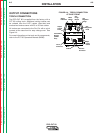
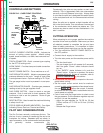
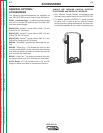
SAFETY STATUS INDICATOR
• If the "SAFETY" status indicators light at any time,
check the following:
- Check the assembly of the torch consumables. If
they are not properly in place, the machine will not
start. Make sure that the shield cup is hand
tight. Do not use pliers or overtighten.
OPERATION
B-6 B-6
PRO-CUT 80
Return to Section TOC Return to Section TOC Return to Section TOC Return to Section TOC
Return to Master TOC Return to Master TOC Return to Master TOC Return to Master TOC
3030
00
VERVERTICAL ANGLETICAL ANGLE
FOR CUTTINGFOR CUTTING
CUT
90
0
TORCH AT 30
0
ANGLE
TO PIERCE
ROTATE TO
90
0
ANGLE TO CUT
ANGLE
MAINTAINED
THROUGHOUT
GOUGE
TORCH HELD AT
45
0
ANGLE
THROUGHOUT GOUGE
ANGLE
OF APPROACH
Direction of Travel
5° - 15°
10° - 20°
Arc Lag
Leading Angle