Reference Manual for the Model FVS318 Cable/DSL ProSafe VPN Firewall
3-4 Preparing Your Network
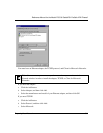
d. Select TCP/IP, and then click OK.
If you need Client for Microsoft Networks:
a. Click the Add button.
b. Select Client, and then click Add.
c. Select Microsoft.
d. Select Client for Microsoft Networks, and then click OK.
3. Restart your PC for the changes to take effect.
Assign TCP/IP configuration by DHCP
After the TCP/IP protocol components are installed, each PC must be assigned specific
information about itself and resources that are available on its network. The simplest way to
configure this information is to allow the PC to obtain the information from the internal DHCP
server of the FVS318 VPN Firewall. To use DHCP with the recommended default addresses,
follow these steps:
1. Connect all PCs to the firewall, then restart the firewall and allow it to boot.
2. On each attached PC, open the Network control panel (refer to the previous section) and select
the Configuration tab.
3. From the components list, select TCP/IP->(your Ethernet adapter) and click Properties.
4. In the IP Address tab, select “Obtain an IP address automatically”.
5. Select the Gateway tab.
6. If any gateways are shown, remove them.
7. Click OK.
8. Restart the PC.
Repeat steps 2 through 8 for each PC on your network.
Selecting Internet Access Method
1. On the Windows taskbar, click the Start button, point to Settings, and then click Control Panel.
2. Double-click the Internet Options icon.


