


3-20
Cisco Application Deployment Engine (ADE) 2130 and 2140 Series Appliance Hardware Installation Guide
78-18579-02
Chapter 3 Installing the Cisco ADE 2130 and 2140 Series Appliance
Powering Up the Cisco ADE 2130 and 2140 Series Appliance
Powering Up the Cisco ADE 2130 and 2140 Series Appliance
Warning
Do not touch the power supply when the power cord is connected. For systems with a power switch,
line voltages are present within the power supply even when the power switch is off and the power
cord is connected. For systems without a power switch, line voltages are present within the power
supply when the power cord is connected.
Statement 4
Warning
This equipment is intended to be grounded. Ensure that the host is connected to earth ground during
normal use.
Statement 39
This section explains how to power up the appliance. Depending on whether your appliance has AC or
DC power supplies, see the appropriate section:
Power-Up Procedure (AC Power Supply), page 3-20
Power-Up Procedure (DC Power Supply), page 3-21
Warning
Never install an AC power module and a DC power module in the same chassis.
Statement 1050
Power-Up Procedure (AC Power Supply)
To power up a Cisco ADE 2130 and 2140 Series appliance with an AC power supply and verify its
initialization and self-test, follow this procedure. When the procedure is finished, the appliance is ready
to configure.
Step 1 Review the information in the “Safety Guidelines” section on page 2-2.
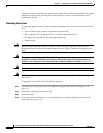
Step 2 Before proceeding, if the AC power cord is connected directly into the AC power outlet and because the
AC power cord provides its own ground conductor, you only need to ensure that the rack has been
properly grounded. (See the “Connecting the Appliance AC Power” section on page 3-12 for more
information.)
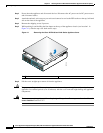
Step 3 Plug the AC power cord into the power cord receptacle at the rear of the appliance. (See location 1 in
Figure 1-5 on page 1-9.)
Step 4 Connect the other end of the power cord to a power source at your installation site.
Step 5 If there is a second AC power supply, repeat Steps 3 and 4 for the second power supply.
Step 6 Press the power button on the front of the appliance. (See location 9 in Figure 3-13 on page 3-21.)
The appliance should begin its powerup procedure.
Step 7 After the operating system boots up, observe the front-panel LEDs to verify that your system is operating
properly. (See Figure 3-13 on page 3-21 and the “Checking the LEDs” section on page 3-21.)
Once the operating system boots, you are ready to initialize the basic software configuration. (See the
software installation guide or user guide that shipped with your appliance for proper configuration
procedures.)