


ERX 8.0.x Hardware Guide
CAUTION: Do not use the fan tray handle to carry the fan tray assembly. Use the
handle o nly to p
ush the tray into the chassis.
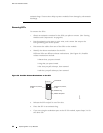
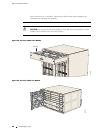
1. Hold the tray horizontally (ERX-14xx models) or vertically (ERX-7xx models
and ERX-310 ro
uters) or so that the captive screws point toward you and you
can read text on the labels.
2. Place the bott
om corners of the tray housing in the plastic shelf guides of the
fan tray compartment; push toward the back of the chassis halfway, and stop.
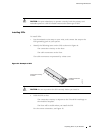
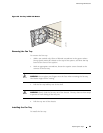
3. Push the fan tr
ay toward the back of the shelf until it stops.
An electrical connector on the back of the fan tray pairs with an electrical
connector at t
he back of the shelf.
4. With an appropriate screwdriver, tighten the captive screws.
Alternate between screws when tightening them to ensure that the electrical
connectors at the back of the tray fit tightly.
5. (ERX-14xx model only) Push the top bezel back on the front of the system.
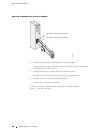
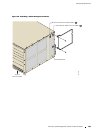
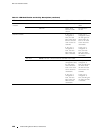
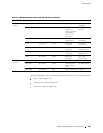
Installing a Cable-Management Bracket on ERX-7xx Models
You can install a cable-management bracket to accommodate cables of
different sizes on ERX-7xx models. See Figure 46.
For wider X.21/V.35 cables, mount the bracket in the last row of perforation
holes in the
chassis so that the bracket allows for maximum spacing (A).
For smaller
cables, mount the bracket closer to the front of the chassis (B).
Use two (2) #
10 self-tapping screws to secure the bracket.
100 Installing a Cable-Management Bracket on ERX-7xx Models