


ERX 8.0.x Hardware Guide
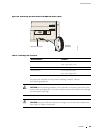
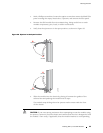
CAUTION: If you meet strong resistance when attempting to seat the module using
the ejectors, r
emove it from the chassis and confirm that the slot is designed to h ol d
the module. Then verify, if applicable, that the module matches its correspondin g
module (I/O module or line module). Also, be sure that you have aligned the top
and bottom edg
es in the correct matching tracks.
CAUTION: Be sure to cover every empty slot with a blank filler panel to protect the
system from dust or other foreign substances and to ensure proper system cooling.
CAUTION: Do no
t discard the antistatic bag. When a module is not in use, store it
in an antistatic bag.
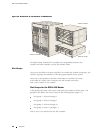
Order of Installation
Before you attempt to install or replace a line module (inse rted in the front of
the cha ssis), make sure the co rrespond ing I/O modu le (inserted i n the rear of
the chassis)
is already in place. The slot diagnostics run when a line module
is installed in a chassis slot. If the cor respondin g I/O module is not present, the
diagnostics fail, a nd you need to remove and reinsert the mo du le.
Required Tools and Safety Items
Youneedthefollowingtoolstoinstallalinemodule:
A Phillips screwdriver
An ESD wrist strap
Safety Guid
elines
Before and d
uring the installation process, observe the following precautions:
WARNING: Do not work on the system or connect or disco nnect cables during
lightning ac
tivity.
40 Safety Guidelines