


ERX 8.0.x Hardware Guide
Preparing the Equipment Racks
Following your installation plan, use a ta pe measure and marking pen to measure
and mark space
on each equipment rack for each router component. For horizontal
spacing, follow Network Equipment Building System (NEBS) requirements. If you
choose not to install a plenum, be sure to include 2 U of spa ce between each
chassis for p
roper exhaust. A plenum, however, is highly recommended.
Installing the Router
To complete the installation of the router in a rack, you need:
A Phillips screwdriver
Depending on the router, up to eight 10 -32 x 3/8 Phillips screws (provided with
the router) f
or each router to be installed
WARNING: Thr
ee people are required to install the router in a rack: two to lift the
system into position and one to screw it to the rack.
CAUTION: Make sure all persons handling a router wear an antistatic device.
To install the router in the rack:
1. With one person standing on the left side of the router and another standing
on the right side, lift the router into the rack.
2. Position the router in its designated location in the equipment rack. Make
sure the holes of the mounting brackets align evenly with the holes of the
equipment ra
ck on both side s.
3. Starting at the bo ttom, have the third person secu re the router in the
equipment r
ack by using the 10-32 x 3/8 Phillips screws.
4. Connect the necessary cables. (See “Cabling ERX Routers” on page 53 for
instructio
ns on installing the cables.)
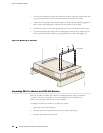
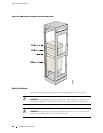
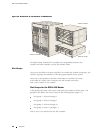
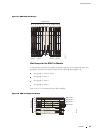
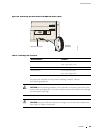
Figure 15 illustrates a distribution rack w ith o ne ERX-310 router, one
ERX-7xx mod
el, and on e ERX-14xx model installed.
32 Rack-Mounted Installation