


ERX 8.0.x Hardware Guide
module (I/O module or line module). Also, be sure that you have aligned the top
and bottom edg
es in the correct matching tracks.
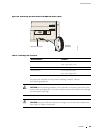
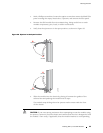
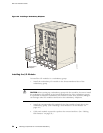
7. Insert the module into the backplane by simultaneously depressing both
ejectors (as s
hown in Figure 20) and exerting forward pressure on the module.
8. Tighten the module’s captive screws using a Phillips screwdriver. Alternately
turn each scre
w several times before tightening them co m pletely to allow
themoduletositcorrectly.
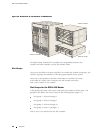
Installing Line and I/O Modules
This section describes the procedures for installing line and I/O mod ul e s.
NOTE: Install the I/O module before you install the corresponding line module;
otherwise, t
he diagnostics fail and the line m odule’s status is listed as in active
when you issue the show version command. If this occurs, remove and reinsert
the line module.
Installing a
Line Module or an I/O Module
To install a m
odule:
1. Ground yours
elf by using an antistatic wrist strap or other device and connect
it to the ESD grounding jack on the chassis.
2. Choose the s
lotwhereyouwanttoinsertthemodule.
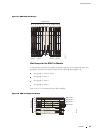
NOTE: Line modules are in the front of the system and I/O modules are in the
back of the sy
stem.
44 Installing Line and I/O Modules