


SERVICE TROUBLESHOOTING 26 Manual 0-2533
2. If the coolant conductivity indicator is not lit with
the probe disconnected, measure between the
Logic PC Board common (TP1) and J3-1. If the
voltage measures below +12 VDC, replace the LED
PC board. If the voltage measures above +12 VDC,
replace the Logic PC Board.
K. Power Supply Start Circuit
NOTE
Refer to Appendix IX for Start Circuit Diagram.
The start signal enters the Merlin at J15-24(sig) and
J15-25 (return) or if no remote is used it could be wired
to TB2-3 & 4. From there it goes directly to the Logic
PC Board. For troublshooting remove any remote con-
nections from either J15 or TB2. Connect a jumper
from TB2-1 to TB2-2 to enable the Merlin.
The RUN (D1) and READY (D2) leds on the Logic PC
Board should be on. If The front panel TEMP led is
green and the COOLANT PRESSURE led is on but
READY is not on, the Logic PC Board is defective. If
READY is on and RUN isn’t, check that RUN/SET/
PURGE is set to run. Measure for less than 1 VDC on
the Logic PC Board J1-13 to J1-12. If correct the Logic
PC Board is defective. If greater than 1 VDC, the
RUN/SET/PURGE switch or wire connections to it
are defective.
If RUN and READY are on, connect a jumper from
TB2-3 to TB2-4. Logic PC Board START led, D3,
should come on and gases start flowing. If not, check
for less than 1 VDC at J1-19 to J1-18. If correct, Logic
PC Board is defective. If greater that 1 V, wiring from
TB2 to J1 is defective.
After the gases flow for the selected preflow time the
W ON led should light and both the main contactor
(W1 or W2) and PCR contactor should come on. If W
ON does not light, even momentarly, the Logic PC
Board is defective.
If W ON is on for a moment then off but neither W1
or W2 comes on even momentarly do the following:
The Logic PC Board has a circuit to monitor the power
supply output voltage. If the circuit doesn't sense
voltage in 75 ms, if the contactor doesn’t come on, it
shuts off the power to the contactor which makes it
hard to troublshoot. Connecting a jumper between
TP4 and TP1 on the Logic PC Board disables the volt-
age sensing circuit so W ON led stays on.
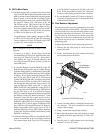
On the Logic PC Board, K2, sends 120 VAC to the Volt-
age Selection PC Board (refer to Appendix VI). Relay
K5 directs that voltage to either W1 or W2 depending
on the level of incoming line voltage. If high, LED
D38 on the Voltage Selection PC Board will be ON
and the 120 VAC should go to W2 otherewise it goes
to W1. The first step is to measure for 120 VAC from
Logic PC Board J2-9 to wire #110 (PCR coil, MC1 or
MC2 coils). If no voltage, the Logic PC Board is faulty.
If about 120 VAC is present, measure the voltage at
the W contactor coil (W2 if LED on Voltage Selection
PC Board is ON, or else W1). If about 120 VAC is
present the contactor is faulty. If no voltage, check
from wire #110 to J6-1 and J6-3 on the Voltage selec-
tion PC Board. One of the two should have about
120VAC, if not check J6-5. If it measures 120VAC re-
place the voltage selection PC Board. If there is no
voltage at J6-5 but was on J2-9, there is a faulty con-
nection (wire #23).
L. Remote Control Start Circuit
NOTE
Refer to Appendix IX for Start Circuit Diagram.
The start signal from the cutting machine controller
enters the RC6010 at J29 or J6 and may be either a
momentary closure (J29-1) or sustained closure (J29-
3). It passes through optical isolation circuits and, if
the ENABLE is on and the station select input is ac-
tive, lights internal led D103. If the Standoff Control
(SC10) is not used, start goes to the remote cable at
J37-9.
If the Standoff Control (SC10) is connected, then the
start signal goes to it, active low at J5-13, lights inter-
nal indicator D79 and starts the find height sequence.
Once height is found the front panel PLASMA ON
inicator comes ON. If FIND HT is not ON, the find
height function is by passed and PLASMA ON comes
on immediately. The start signal then is returned to
the Remote Control (RC6010), active low on J7-17, and
to the remote cable on J37-9 to the Power Supply re-
mote connector J15-24 and TB2-3 and on to the Power
Supply Logic PC Board.
If the Standoff Control (SC10) is installed and the sys-
tem won’t find height the problem is in the Standoff
Control (SC10), Remote Control (RC6010) or the in-
terconnections to the cutting machine. Set FIND HT
off, it the torch starts now the problem is in the Stand-
off Control (SC10).
NOTE
Refer to Section 5, Customer/Operator Service, in
the Standoff Control Instruction Manual.
If it doesn’t start open the cover of either the Standoff
Control (SC10) or Remote Control (RC6010), which-
ever one is on top, and disconnect the ribbon cable at
J5 or J7. Then if the Power Supply will start the prob-