


REPLACEMENT PROCEDURES 46 Manual 0-2533
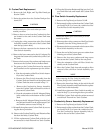
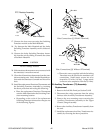
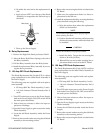
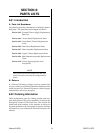
d. Re-solder the wire lead to the replacement di-
ode.
e. Apply a layer of RTV over the top of the Diode
Assembly to encapsulate the lead and top of
the diode.
RTV
70 Amp
Diode
Wire Lead
A-01166
f. Close up the Power Supply.
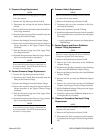
B. Relay Replacement
1. Remove the Right Side Panel per Section 5.04-B.
2. Move the Relay Hold-Down Spring to the side of
the Relay Assembly.
3. Pull the Relay Assembly from the Relay Socket.
4. Install the replacement Relay Assembly by revers-
ing the above procedure.
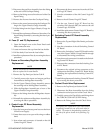
C. 150 Amp REV Diode Replacement
The Diode Replacement Kit (Cat # 8-6152) is a direct
parts replacement for the failed Diode Assembly in
the Power Supply.
The following parts are supplied with each replace-
ment assembly:
• 150 Amp, 800V Rev Diode Assembly (1 each)
• 1.06 inch diameter Thermal Interface Pad (1
each)
1. Turn OFF main input power to the Power Supply
both at the Power Supply ON/OFF switch and at
the main power disconnect.
2. Wait at least two minutes to allow the input ca-
pacitors to discharge.
3. Open the Power Supply to gain access to the faulty
Diode Assembly.
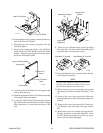
4. Locate the old Diode Assembly inside the Power
Supply.
5. Remove the nut and washer securing the old diode
assembly to the mounting surface.
6. Remove the nut securing the diode wire lead to the
PC Board.
7. Make sure the replacement diode is a direct re-
placement for the old one.
8. Install the replacement diode by reversing the above
procedure and noting the following:
a. Wipe the surface clean where the replacement
diode is to be installed.
NOTE
The thermal interface pads must be properly aligned
when replacing the diode.
b. Position the thermal interface pad between the
diode and contact surface where the diode will
be installed.
CAUTION
Diodes can overheat if not properly installed.
c. Install the diode. Torque the nut securing the
diode to 34 in-lbs (3.8 Nm).
d. Reinstall the nut and washer securing the re-
placement diode wire lead to the PC Board.
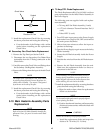
D. 150 Amp STR Diode Replacement
The Diode Replacement Kit (Cat # 8-6153) is a direct
parts replacement for the failed Diode Assembly in
the Power Supply.
The following parts are supplied with each replace-
ment assembly:
• 150 Amp, 800V Str. Diode Assembly (1 each)
• 1.06 inch diameter Thermal Interface Pad (1
each)
1. Turn OFF main input power to the Power Supply
both at the Power Supply ON/OFF switch and at
the main power disconnect.
2. Wait at least two minutes to allow the input ca-
pacitors to discharge.
3. Open the Power Supply to gain access to the faulty
Diode Assembly.
4. Locate the old Diode Assembly inside the Power
Supply.
5. Remove the nut and washer securing the old diode
assembly to the mounting surface.
6. Remove the nut securing the diode wire lead to the
PC Board.