


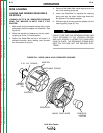

7. To remove the Readi-Reel from the adapter,
depress the retaining spring tab with thumb while
pulling the Readi-Reel cage from the molded
adapter with both hands. Do not remove the
adapter from the spindle.
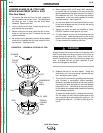
LOADING A 15 TO 30 LB. SPOOL
(12" DIAMETER):
(For 8" spools, a K468 spindle adapter must be used.)
1. Remove the locking collar and the Readi-Reel
adapter shipped on the 2" diameter spindle
(adapter is not required).
2. Place the spool on the spindle making certain the
brake holding pin enters one of the holes in the
back side of the spool. Be certain the wire comes
off the reel in a clockwise direction when de-reeled
from the bottom of the coil.
3. Replace and tighten the locking collar.
ELECTRODE FEEDING AND BRAKE ADJUSTMENT
1. Turn the Readi-Reel or spool until the free end of
the electrode is accessible.
2. While tightly holding the electrode, cut off the bent
end. Straighten the first six inches. Cut off the first
inch. (If the electrode is not properly straightened,
it may not feed or may not go into the outgoing
guide tube, causing a "birdnest.")
3. Insert the free end through the incoming guide
tube.
4. Press the gun trigger or "cold inch" (if used) and
push the electrode into the drive roll.
USE THE "COLD" TRIGGER SWITCH POSITION, OR
"COLD INCH" OPTION WHEN LOADING. WHEN
INCHING WITH A "HOT" GUN TRIGGER, THE ELEC-
TRODE AND DRIVE MECHANISM ARE ALWAYS
"HOT" TO WORK AND GROUND AND COULD
REMAIN "HOT" SEVERAL SECONDS AFTER THE
GUN TRIGGER IS RELEASED.
5. Inch the electrode through the gun.
NOTE: When feeding soft jacket electrodes such as
Lincore 60-0, remove tip from the gun tube before
feeding electrode through the gun. When the electrode
is cut off, the start end of the electrode is usually too
large to fit through the tip.
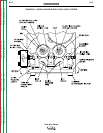
6. Adjust the brake tension with the thumbscrew on
the spindle hub, until the reel turns freely but with
little or no overrun when wire feeding is stopped.
Do not overtighten.
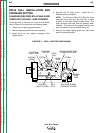
WHEN USING THE EXTENSION ASSEMBLY
(models LN-9NE and LN-9SE)
1. Slide the ingoing guide tube of the hand crank to
the forward position.
2. Remove start end of coil from hole in wire reel
cover, straighten the first six inches or so of the
wire and then insert this end in the ingoing guide
tube. Push a foot or so of wire through.
3. Pull the ingoing guide tube back to the rear position
and rotate it 90
o
so that it will remain in this position
during the cranking operation.
4. Pull the plastic hand crank handle to the "out"
position in the arm.
5. Pull the shaft and drive roll assembly to the "out"
position with the left hand.
6. Apply a downward pressure to the idler roll pres-
sure arm with the right hand. Maintain this pres-
sure and start cranking the wire through the sys-
tem. Keep the conductor cable as straight as pos-
sible during the loading operation. This will make
it much easier to crank the wire through. Crank
until the wire touches the drive rolls and feed the
wire the rest of the way through the cable and gun
assembly.
The electrode is "HOT" to ground while inching with the
gun trigger.
7. Push the plastic of the hand crank to the "in" posi-
tion and shift the ingoing guide tube to the forward
position.
OPERATION
B-15 B-15
LN-9 Wire Feeder
Return to Section TOC Return to Section TOC Return to Section TOC Return to Section TOC
Return to Master TOC Return to Master TOC Return to Master TOC Return to Master TOC
WARNING
WARNING