


1... INTRODUCTION
USING THE OMP-MODL
1-6
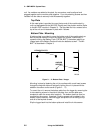
SUMMARY OF STEPS IN UTILIZING THE OMP-MODL
In a typical application of the OMP-MODL portable data logging system, the
following sequence of steps would be involved. Details of each step are presented
in later sections of this manual.
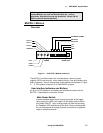
1. Install the required Interface Modules into the OMP-MODL
System Base. Configure Interface Module hardware switches if
applicable (eg enabling a front end divider for the +/-30VDC
range on the HLIM-1)
2. Connect a serial cable link between the OMP-MODL and your
PC. Launch HyperWare and establish the connection.
HyperWare will automatically configure for the detected logger
model (OMP-MNL, OMP-MODL, or HyperLogger). Then change
to the HyperNet Development Screen.
3. Query the OMP-MODL for its current hardware configuration by
clicking the NEW button.
4. Construct a Program Net for this logging session by dragging
and dropping icons onto the HyperNet screen, then connecting
signals between the icons. Save the Program Net to disk and
print out a Terminal Strip Adapter wiring diagram for field
reference.
5. Transfer the Program Net to OMP-MODL memory via the serial
link and disconnect the serial link.
6. Install the OMP-MODL at the site and make the appropriate
wiring connections to the I/O Terminal Strips and modem (if
used).
7. Enable the OMP-MODL, then as a quick pre-departure check,
check readings at various pre-programmed Program Net nodes
using the Next and Select buttons while viewing the OMP-MODL
display.
8. Leave the OMP-MODL to collect data.
9. Later, connect up to the OMP-MODL via a serial link (RS-232 or
modem) or retrieve the PCMCIA memory card and from within
HyperWare, download the OMP-MODL memory to a file on the
PC.
10. For a fast and immediate review of the collected data, double-
click on the data icon and HyperPlot will automatically load and
graphically display the collected data.
11. Save the desired HyperPlot graphic view as a Windows Bitmap
file , then switch to your Windows based wordprocessor and
seamlessly insert the saved graphic into your test report.
12. Optionally, use the HyperWare Post-Processing capability to
configure a special data reduction/ conversion icon network.
Then run the collected data file through the post processor and
generate a text file, Excel Spreadsheet file or another HyperPlot
file.