


Playlist modules cannot be nested. If you insert module "B" that already includes module
"A" to the current playlist, all B's events, including A's, are inserted, but the comment lines
corresponding to module "A" are ignored.
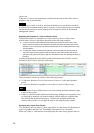
7 Enter the type and title of this playlist in the respective text boxes, then click [OK].
Note that the Scheduling Application also enables you to specify the playout period of the
playlist in the Properties dialog box.
See the explanation of the Properties dialog box for details.
8 Click [OK] in the Edit Playlist (Module List) window to save the playlist.
A confirmation message appears.
9 Click [Yes].
The system saves the playlist.
Hint
You can preview the playlist using the procedure described in "Checking a Playlist."
Undoing the last Operation
The Edit Playlist (Module List) window always keeps the playlist just before the last
editing operation, so that you can cancel the last operation. Hold the Ctrl key down and
press the Z key to cancel the last operation.
Specifying the Date for Automatic Deletion of a Playlist (Presentation Application
Only)
Right-click the desired playlist in the Material Management window, then click [Set
Delete Date] or [Clear Delete Date]. When you click [Set Delete Date], a calendar
appears. Select the date for deletion, then click [OK].
In the case of the Scheduling Application, the day after the playout end date is
automatically specified as the date of automatic deletion. You cannot change it.
Playlist modules that are shown in blue or purple in the Material Management window
have no automatic deletion date data, as they would never be sent to the network
players.
Note
To use the automatic deletion function of the network player, specify "Yes" for
"Activate 'Automatic Delete'" on the "System Administrator Setup" screen of the
network player.
55